1. Instruções importantes de segurança
Leia todos os avisos de segurança, instruções, ilustrações e especificações fornecidas com esta ferramenta elétrica. Não seguir todas as instruções listadas abaixo pode resultar em choque elétrico, incêndio e/ou ferimentos graves.
- Utilize sempre os equipamentos de proteção individual (EPI) adequados, incluindo óculos de segurança, luvas e protetores auriculares.
- Keep hands and feet away from the chain when the tool is operating.
- Ensure the battery is removed before making any adjustments, changing accessories, or storing the tool.
- Não opere a ferramenta em atmosferas explosivas, como na presença de líquidos inflamáveis, gases ou poeira.
- Mantenha crianças e espectadores afastados enquanto estiver operando uma ferramenta elétrica. Distrações podem fazer com que você perca o controle.
- Mantenha o pé e o equilíbrio adequados em todos os momentos. Não exagere.
- Use a ferramenta correta para sua aplicação. Não force a ferramenta.
- Guarde as ferramentas quando não estiverem em uso, fora do alcance de crianças, e não permita que pessoas não familiarizadas com a ferramenta elétrica ou com estas instruções a operem.
- Always inspect the tool for damage before use. Do not use if damaged.
2. Produto acabadoview
The Protmex PTX-DUA-A is a versatile 2-in-1 cordless tool designed for efficient tree pruning and wood cutting. It can be used as a compact mini chainsaw or extended into a pole saw for reaching higher branches.
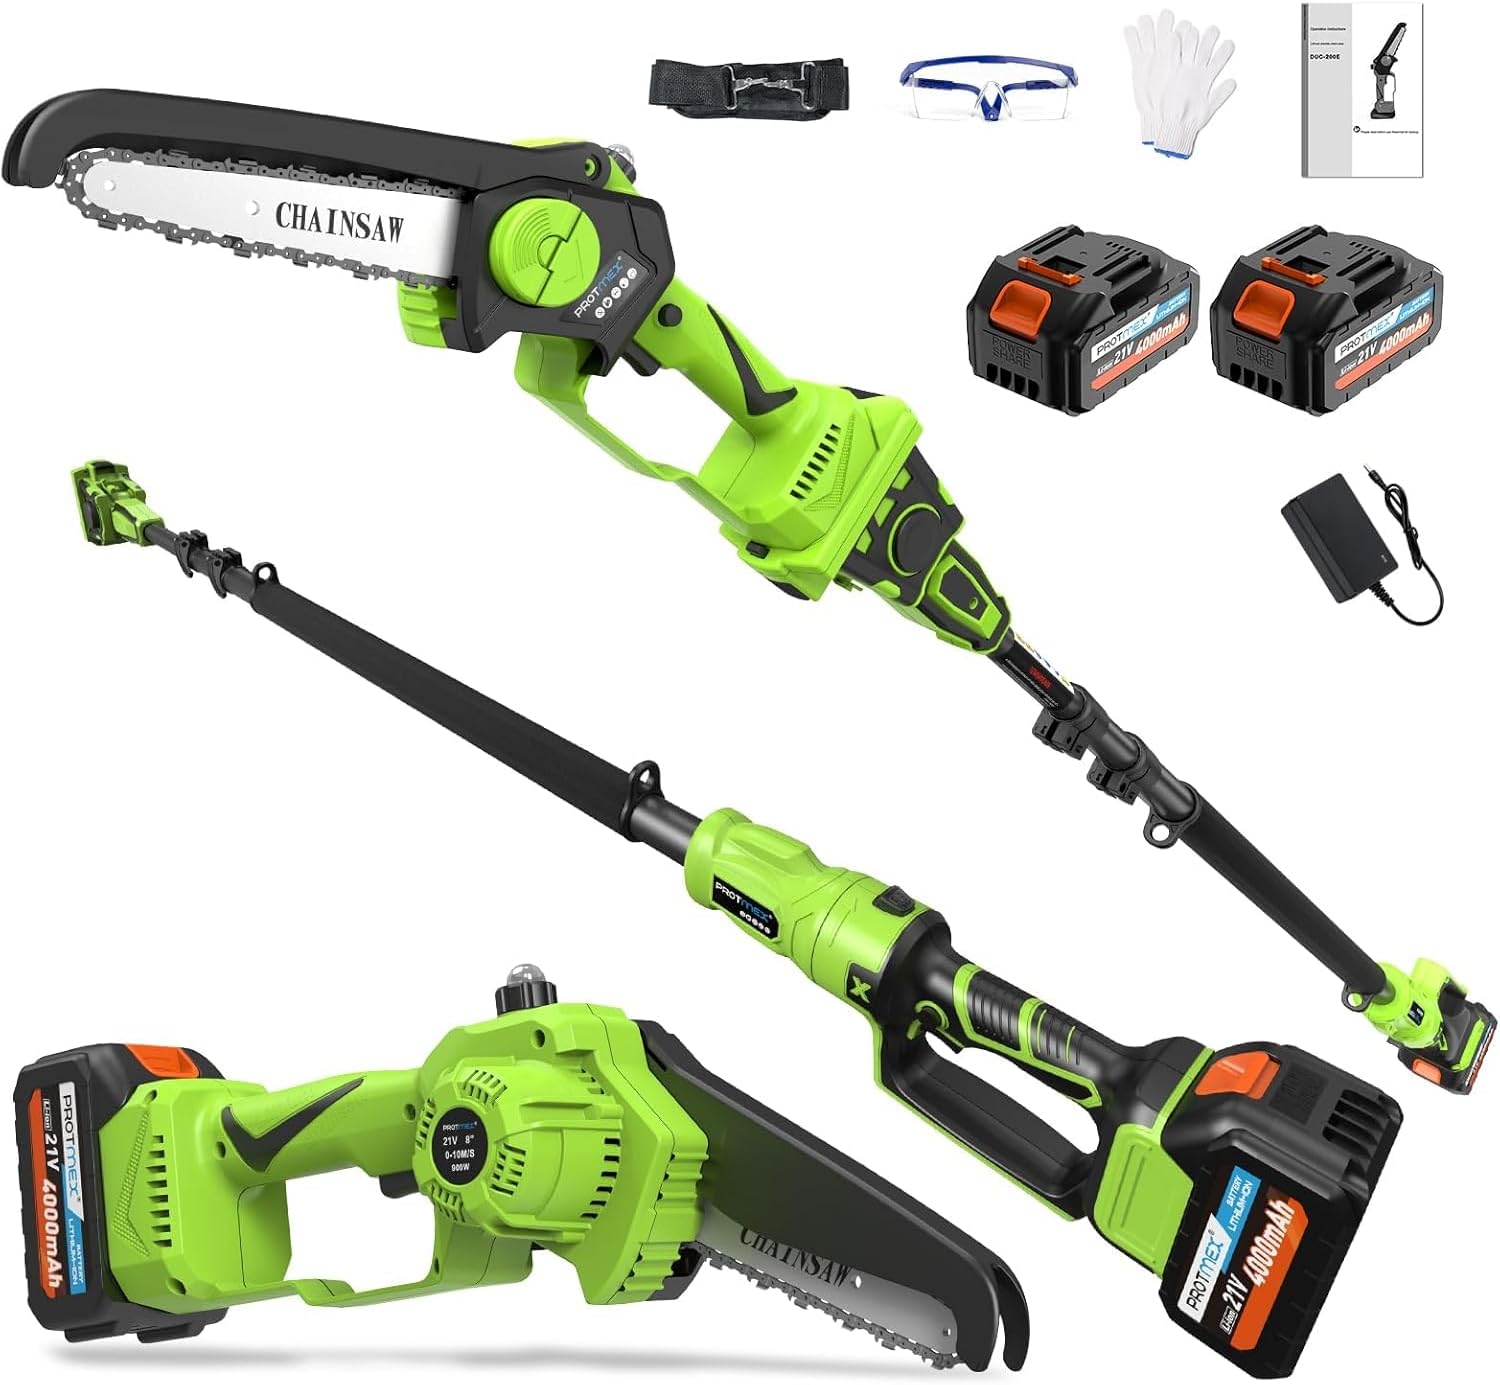
Figura 1: The Protmex 2-in-1 Cordless Pole Saw and Mini Chainsaw, shown with its various components including the main unit, extension pole, two batteries, charger, safety glasses, and gloves.
Conteúdo da embalagem:
- Chainsaw Unit (6-inch)
- Poste de Extensão
- 2 baterias de íon-lítio de 21V 4000mAh
- Carregador de bateria
- Óculos de segurança
- Luvas de trabalho
- Manual do usuário
3. Configuração e montagem
3.1 Carregamento da bateria
Before first use, fully charge both batteries. Insert the battery into the charger and plug the charger into a standard power outlet. The indicator light on the charger will show the charging status.

Figura 2: The included 21V 4.0Ah Lithium-Ion batteries and charger. Ensure batteries are fully charged before use for optimal performance.
3.2 Chain Installation (if required)
The chain may come pre-installed. If not, or if replacing the chain, follow these steps:
- Turn the green cover counter-clockwise to remove it, then take off the cover, guide bar, and old chain (if replacing).
- Push the pin to the RIGHT to lock it.
- Place the guide bar and new chain on the saw, ensuring the pin fits through the guide bar hole. Check the chain alignment.
- Press the guide plate near the pin, return the pin to its original position; the chain will self-tension.
- Reinstall the covers, ensuring everything is secure.
- Tighten the green cover clockwise UNTIL IT CAN'T TURN FURTHER.

Figura 3: Visual instructions for installing or replacing the chainsaw chain. Proper installation is crucial for safe and effective operation.
3.3 Assembling the Pole Saw Configuration
To convert the mini chainsaw into a pole saw:
- Attach the chainsaw head to the extension pole. Ensure it clicks securely into place.
- Adjust the pole height to your desired working length. The pole is retractable and can extend to provide a maximum working length of approximately 15 feet (based on a 6ft person holding the pole at shoulder level).
- Insert a charged battery into the battery slot on the handle.

Figura 4: Assembly sequence for the pole saw configuration. This image illustrates attaching the chainsaw head, adjusting the pole, and inserting the battery.
4. Instruções de operação
4.1 Operação Geral
Once assembled and with a charged battery, press the safety button and then the trigger to start the chainsaw. The tool features stepless speed control for flexible operation.

Figura 5: The 2-in-1 tool in action, demonstrating its use as both a pole saw for tree pruning and a mini chainsaw for cutting smaller branches.
4.2 Cutting Angles
The chainsaw head offers adjustable cutting angles from 0° to 180°, allowing for versatile cutting in various positions.

Figura 6: The adjustment knob for tool-free chain tensioning and the visual representation of the 0°-180° adjustable cutting angles.
4.3 Recursos de segurança
- Botão de segurança: Prevents accidental activation. Must be pressed before the trigger.
- Wood Chip Guard: Blocks debris during operation.
- Sponge Handle: Provides shockproof grip for comfort and control.
- Design da pulseira: For safer operation, especially when using as a pole saw.

Figura 7: Sobreview of the integrated safety features designed to enhance user protection and operational stability.
5. Manutenção
5.1 Lubrificação da Corrente
The chainsaw features an auto lubrication system. Ensure the oil reservoir is filled with appropriate chainsaw bar and chain oil before each use. This system provides continuous lubrication for smooth cutting and extended chain life.

Figura 8: Demonstrating the auto oil system. Regularly check and refill the oil reservoir to ensure proper chain lubrication.
5.2 Ajuste da tensão da corrente
Proper chain tension is critical for safe and efficient operation. Check chain tension frequently, especially during initial use and after prolonged cutting.
- If loose, turn the cover counter-clockwise to slightly loosen (avoid over-loosening).
- Move the guide bar up/down to self-tension. If not tight, check "HOW TO INSTALL CHAIN" for proper positioning.
- Tighten the green cover clockwise UNTIL IT CAN'T TURN FURTHER. If the chain loosens quickly, it wasn't tightened properly.

Figura 9: Visual instructions for adjusting the chain tension. Correct tension prevents chain derailment and ensures optimal cutting performance.
5.3 Limpeza e Armazenamento
- After each use, remove the battery and clean the tool of sawdust and debris.
- Use a soft brush or cloth. Do not use harsh chemicals.
- Guarde a ferramenta em local seco e seguro, fora do alcance de crianças.
- Ensure the chain is covered with its protective sheath during storage.
6. Solução De Problemas
| Problema | Possível causa | Solução |
|---|---|---|
| A ferramenta não inicia | Battery not charged or improperly inserted; Safety button not pressed; Faulty battery or tool. | Ensure battery is fully charged and correctly inserted. Press the safety button before the trigger. Test with a different charged battery if available. Contact support if problem persists. |
| Chain stops or cuts poorly | Chain tension incorrect; Chain dull; Insufficient lubrication; Battery low. | Adjust chain tension (refer to Section 5.2). Sharpen or replace chain. Refill oil reservoir. Recharge or replace battery. |
| Vibração excessiva | Corrente solta; Corrente ou barra guia danificada. | Verifique e ajuste a tensão da corrente. Inspecione a corrente e a barra guia quanto a danos e substitua-as, se necessário. |
| Vazamento de óleo | Overfilled oil reservoir; Damaged oil cap or seal. | Do not overfill the oil reservoir. Ensure oil cap is securely tightened. Inspect for damage and contact support if leakage continues. |
7. Especificações
| Recurso | Detalhe |
|---|---|
| Número do modelo | PTX-DUA-A |
| Marca | Protmex |
| Fonte de energia | Alimentado por bateria (sem fio) |
| Tipo de Bateria | 21V 4000mAh (4.0Ah) Lithium-Ion |
| Comprimento da corrente | 6 polegadas (15 cm) |
| Velocidade da corrente | 33 pés/s |
| Tipo de motor | Motor sem escovas |
| Adjustable Cutting Angles | 0° - 180° |
| Max Working Length (Pole Saw) | Up to 15 feet (approximate, depending on user height) |
| Peso (Mini Motosserra) | Aproximadamente 3.3 lbs (1.5 kg) |
| Peso total do item | 10.88 pounds (packaging/full kit) |
| Sistema de lubrificação | Automático |
8. Garantia e Suporte
Protmex products are designed for reliability. For warranty information, technical support, or assistance with parts, please refer to the contact information provided in your product packaging or visit the official Protmex website.
The manufacturer offers dedicated support and assistance. If you encounter any issues, please reach out to customer service for solutions.

Protmex is committed to providing quality products and customer satisfaction.


