1. Instruções importantes de segurança
Read all instructions carefully before using the appliance. Failure to follow these instructions may result in electric shock, fire, and/or serious injury.
- Desligue sempre o aspirador da tomada antes de limpar ou realizar qualquer manutenção.
- Do not use the appliance with a damaged cord or plug. If the cord or plug is damaged, it must be replaced by the manufacturer or a qualified service agent.
- Não utilize aspirador de líquidos inflamáveis ou combustíveis, como gasolina, nem em áreas onde esses líquidos possam estar presentes.
- Não aspire nada que esteja queimando ou soltando fumaça, como cigarros, fósforos ou cinzas quentes.
- Mantenha cabelos, roupas largas, dedos e todas as partes do corpo longe de aberturas e peças móveis.
- Utilize apenas conforme descrito neste manual. Utilize somente os acessórios recomendados pelo fabricante.
- Não permita que seja usado como brinquedo. É necessária muita atenção quando usado por ou perto de crianças.
- Não mergulhe o aparelho em água ou outros líquidos.
- Store the vacuum cleaner indoors in a cool, dry place.
2. Produto acabadoview e Lista de Peças
The Taurus Tempest is a versatile wet and dry vacuum cleaner designed for various cleaning tasks. Familiarize yourself with its components before operation.
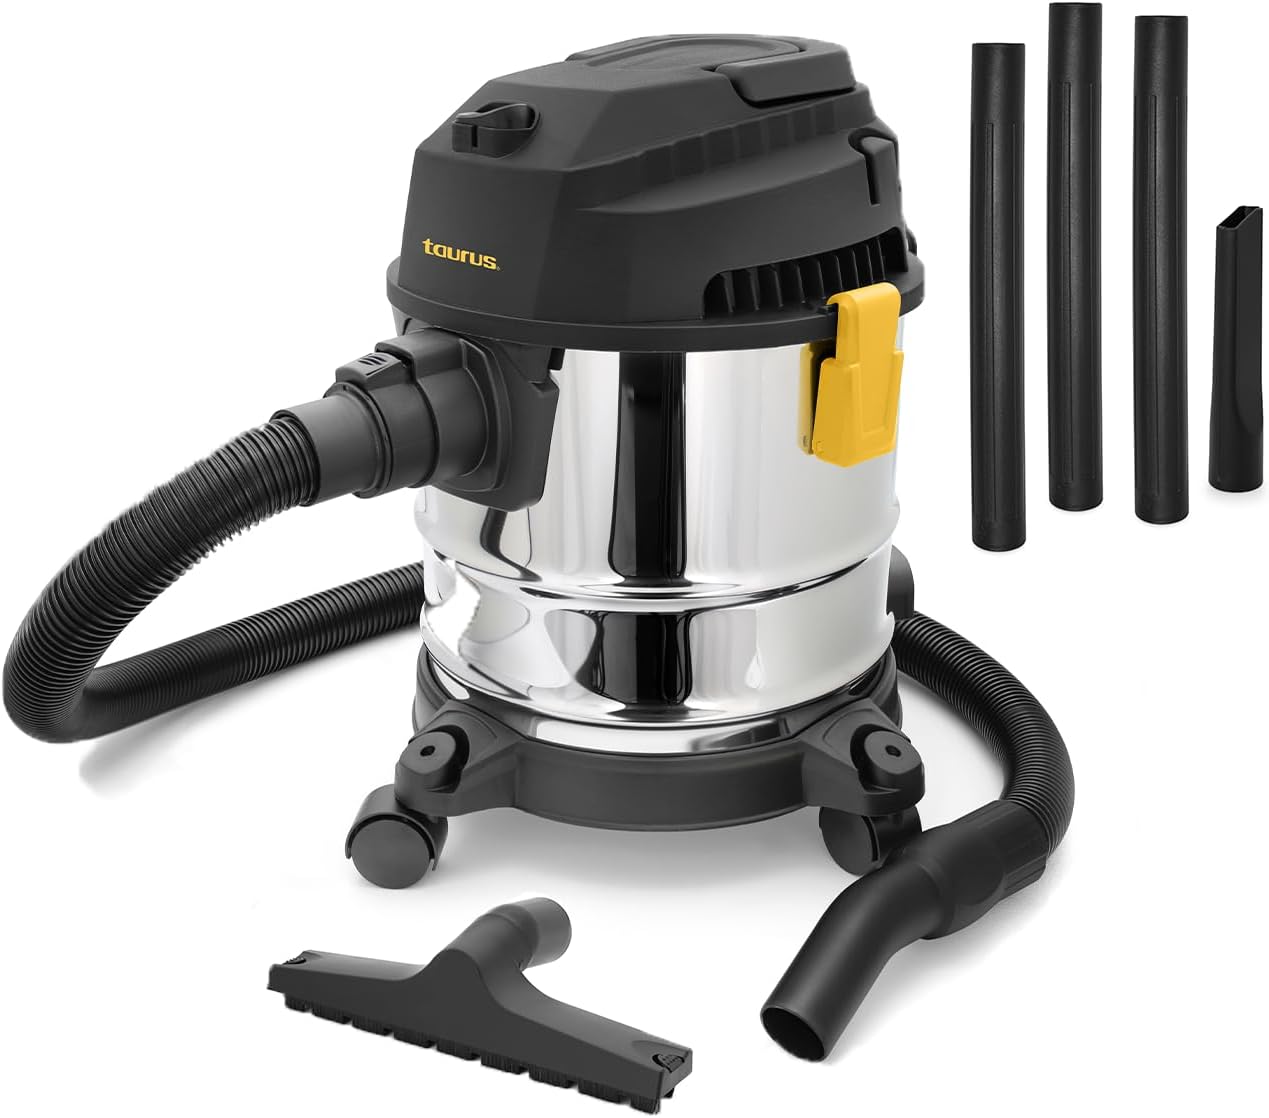
Figura 2.1: The Taurus Tempest Wet & Dry Vacuum Cleaner shown with its main body, hose, and various cleaning attachments.

Figura 2.2: All included accessories for the Taurus Tempest, including extension wands, floor brush, crevice tool, and upholstery tool, along with filters and dust bags.
Componentes incluídos:
- Main Vacuum Unit (Motor Head, Tank)
- Mangueira flexível (1.2 metros)
- Extension Wands (3 pieces, 34.5 cm each)
- Escova de chão
- Ferramenta para fendas
- Ferramenta para estofamento
- Filtro de espuma (para aspiração de líquidos)
- Saco para pó (para aspiração a seco)
- Four 360° Swivel Wheels
- Cabo de alimentação (2.5 metros)
3. Configuração e montagem
Follow these steps to assemble your Taurus Tempest vacuum cleaner before first use.
- Attach the Swivel Wheels: Turn the tank upside down. Insert the four swivel wheels into the designated slots on the base of the tank until they click securely into place.
- Prepare for Dry or Wet Use:
- Para aspiração a seco: Ensure the dust bag is properly installed inside the tank and the foam filter is removed from the motor head.
- Para Aspiração Úmida: Remove the dust bag. Install the foam filter onto the motor head.
- Secure the Motor Head: Place the motor head onto the tank, aligning the clips. Secure the motor head by latching the side clips firmly.
- Conecte a mangueira flexível: Insert the larger end of the flexible hose into the suction inlet on the front of the tank. Twist clockwise to secure it.

Figura 3.1: Proper connection of the flexible hose to the vacuum unit.
- Attach Extension Wands and Accessories: Connect the desired number of extension wands to the free end of the flexible hose. Then, attach the appropriate cleaning accessory (floor brush, crevice tool, or upholstery tool) to the end of the extension wand.
4. Instruções de operação
The Taurus Tempest offers three modes of operation: dry vacuuming, wet vacuuming, and air blowing.
4.1 Aspiração a Seco
This mode is suitable for picking up dust, dirt, debris, and other dry particles.
- Ensure the dust bag is installed and the foam filter is removed.
- Connect the flexible hose and desired accessories.
- Conecte o cabo de alimentação a uma tomada elétrica adequada.
- Ligue o aspirador usando o interruptor de energia.
- Begin vacuuming the dry surfaces.
- After use, turn off the vacuum, unplug it, and empty the dust bag.

Figura 4.1: The vacuum cleaner effectively cleaning a floor surface.
4.2 Aspiração úmida
Use this mode for vacuuming liquids and spills. Do not use the dust bag for wet vacuuming.
- Remove the dust bag from the tank.
- Install the foam filter onto the motor head.
- Connect the flexible hose and appropriate accessories (e.g., floor brush without bristles).
- Conecte o cabo de alimentação a uma tomada elétrica adequada.
- Ligue o aspirador.
- Begin vacuuming liquids. The vacuum will automatically stop suction when the tank is full.
- After use, turn off the vacuum, unplug it, and empty the liquid from the tank. Clean the tank and foam filter thoroughly.
4.3 Air Blower Function
The vacuum cleaner can also function as an air blower for clearing debris from hard-to-reach areas or drying surfaces.
- Locate the blower port on the motor head (opposite the suction inlet).
- Insert the flexible hose into the blower port and twist to secure.
- Conecte o cabo de alimentação a uma tomada elétrica adequada.
- Turn on the vacuum cleaner. Air will now be expelled from the hose.
- Direct the airflow as needed.
- After use, turn off the vacuum and unplug it.
5. Manutenção e Cuidados
Regular maintenance ensures optimal performance and extends the lifespan of your Taurus Tempest vacuum cleaner.
- Esvaziando o tanque: After each use, especially after wet vacuuming, unlatch the motor head and carefully lift it off. Dispose of collected solids or liquids. Clean the inside of the tank with water and mild detergent if necessary, then dry thoroughly.
- Limpeza do filtro de espuma: After wet vacuuming, remove the foam filter from the motor head. Rinse it under running water until clean. Squeeze out excess water and allow it to air dry completely before re-installing or storing.
- Substituindo o saco de pó: For dry vacuuming, replace the dust bag when it is full or when suction power decreases significantly.
- Acessórios de limpeza: Wash the flexible hose and other accessories with water and mild detergent as needed. Ensure they are dry before storage.
- Armazenar: Store the vacuum cleaner and its accessories in a clean, dry place, away from direct sunlight and extreme temperatures. The power cord can be wrapped around the designated hooks on the unit for tidy storage.

Figura 5.1: The power cord neatly wrapped around the vacuum unit for compact storage.
6. Solução De Problemas
Consulte esta seção para obter informações sobre problemas comuns e suas soluções.
| Problema | Possível causa | Solução |
|---|---|---|
| O aspirador não liga. | Sem fonte de alimentação. | Verifique se o cabo de alimentação está firmemente conectado a uma tomada em funcionamento. Verifique o disjuntor. |
| Baixo poder de sucção. |
|
|
| O motor superaquece e desliga. | Thermal protection activated due to prolonged use or blockage. | Turn off the vacuum and unplug it. Allow it to cool down for at least 30 minutes. Check for and clear any blockages before restarting. |
| Vazamento de água do tanque. | Tank not properly sealed or damaged. | Ensure the motor head is securely latched. Check for cracks or damage to the tank. |
7. Especificações do produto
Detailed technical specifications for the Taurus Tempest Wet & Dry Vacuum Cleaner.
| Recurso | Especificação |
|---|---|
| Marca | Touro |
| Nome do modelo | TEMPEST WET & DRY VACUUM CLEANER |
| Recurso especial | Wet/Dry, Air Blower |
| Capacidade | 3.1 galões (12 litros) |
| Sucção Máxima | 14 KPa |
| Comprimento da mangueira | 1.2 metros |
| Comprimento do cabo de alimentação | 2.5 metros |
| Tipo de filtro | Foam (for wet), Dust Bag (for dry) |
| Componentes incluídos | Accessory Kit (Hose, Extension Wands, Floor Brush, Crevice Tool, Upholstery Tool, Filters, Dust Bag) |
| Mobilidade | Four 360° Swivel Wheels |
| Dimensões do produto (C x L x A) | 8.14"C x 11.02"L x 12.99"A (aproximadamente 20.68 cm de comprimento x 27.99 cm de largura x 32.99 cm de altura) |
| Peso do item | 6.72 libras (aproximadamente 3.05 kg) |
| Cor | Prata |
| Uso interno/externo | Interior |

Figura 7.1: Approximate dimensions of the Taurus Tempest vacuum cleaner.
8. Garantia e Suporte ao Cliente
For warranty information, technical support, or service inquiries, please contact Taurus customer service. Keep your purchase receipt as proof of purchase.
Fabricante: Touro
Modelo: TEMPESTADE
For the most up-to-date contact information and warranty details, please visit the official Taurus website or refer to the documentation included with your product at the time of purchase.
Observação: This manual provides general instructions. Specific warranty terms may vary by region and retailer.


