1. Informações de segurança
Operating any generator requires adherence to strict safety guidelines to prevent injury or property damage. Please read and understand all safety warnings before operating this unit.
Segurança contra o Monóxido de Carbono (CO)
This generator is equipped with a CO sentinela sensor, which automatically shuts off the engine if harmful levels of carbon monoxide are detected. While this feature enhances safety, it is not a substitute for proper ventilation.
- NUNCA operate the generator indoors, in a garage, shed, or any enclosed or partially enclosed space.
- Always operate the generator outdoors in an open area, away from windows, doors, and vents.
- Ensure exhaust fumes are directed away from occupied areas.

Image: The CO Sentry feature provides protection against carbon monoxide by alerting and auto-shutting off the generator. Economy Mode helps save fuel.
Segurança de combustível
- Gasoline is highly flammable. Store gasoline in approved containers in a well-ventilated area.
- Propane is also flammable. Ensure propane tanks are securely connected and free of leaks.
- Never refuel a hot or running engine. Allow the generator to cool before adding fuel.
- Do not smoke or allow open flames near the generator or fuel storage areas.
2. Produto acabadoview
The Pulsar NE40BiSRCO is a 4000 Watt portable inverter generator designed for versatility and efficiency. It features dual fuel capability (gasoline and propane), multiple starting options, and a CO Sentry for enhanced safety.
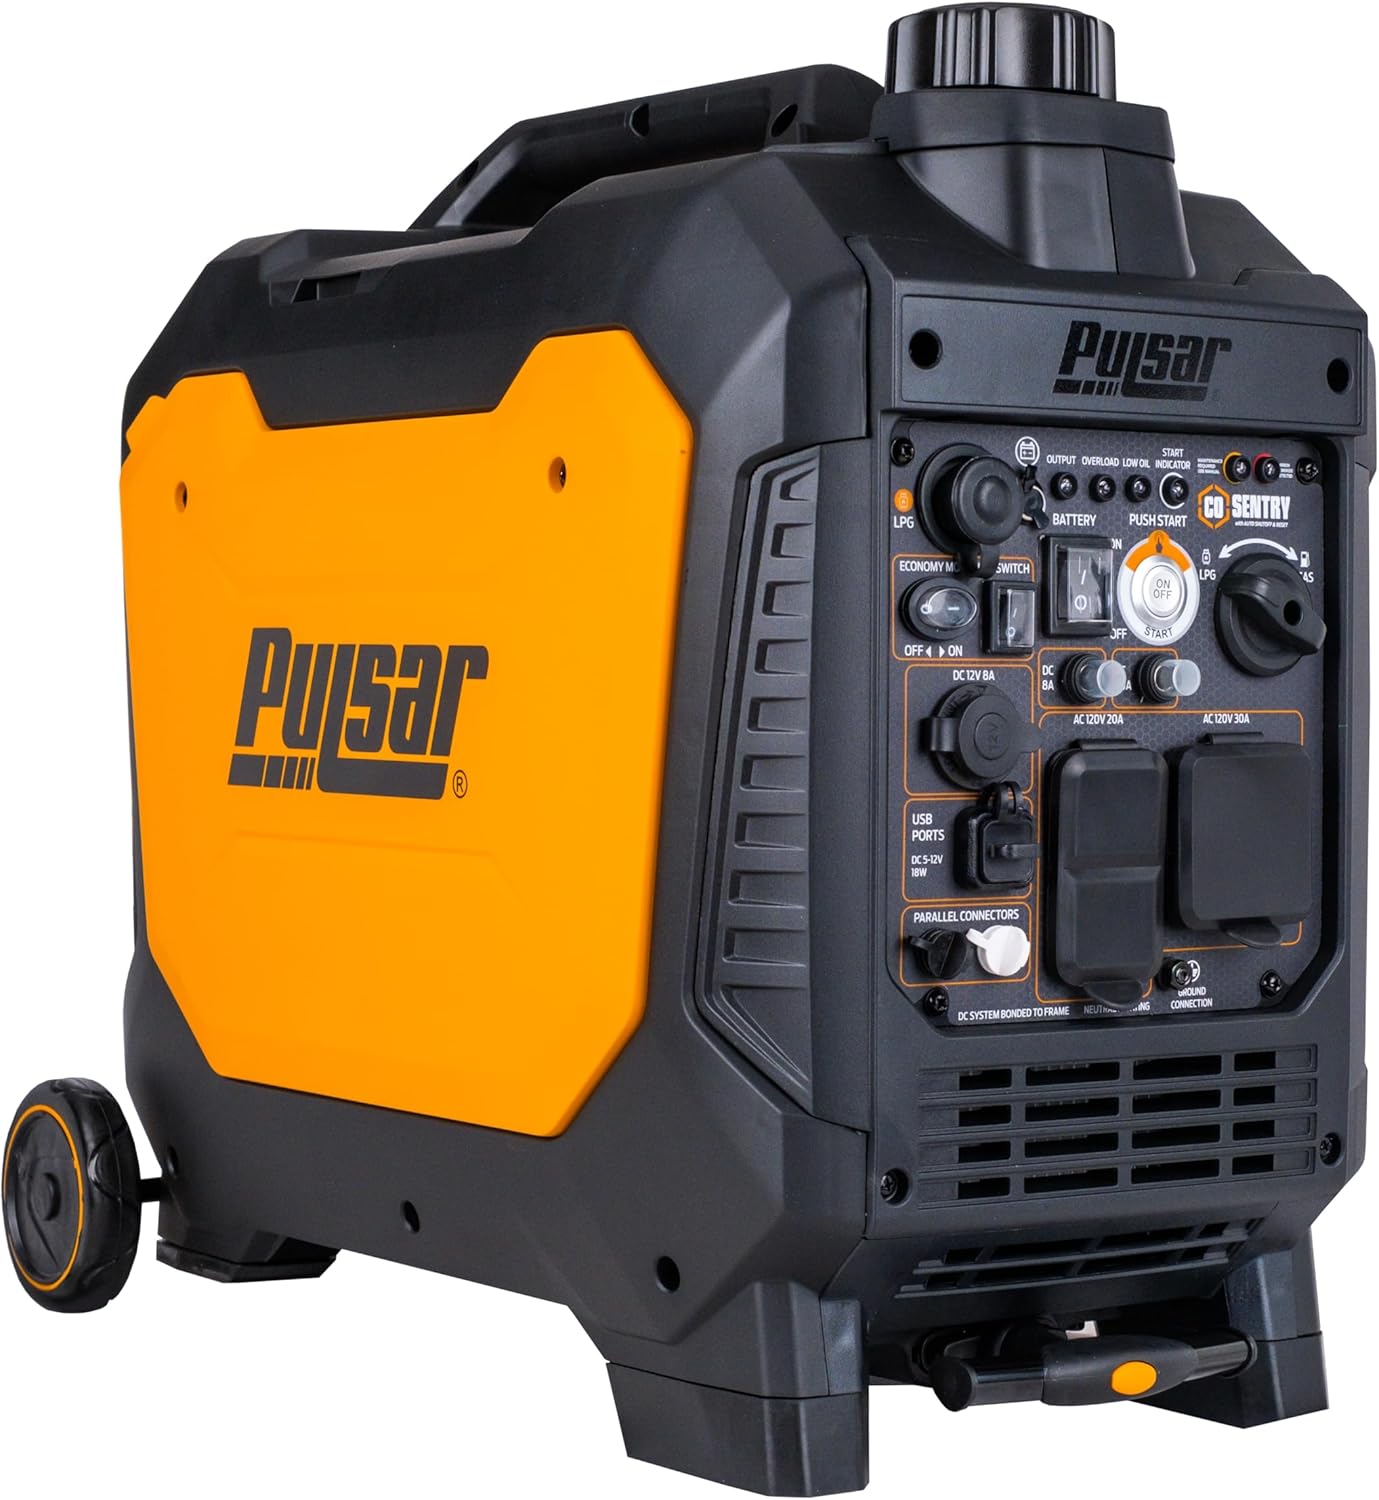
Imagem: Frente view of the Pulsar NE40BiSRCO portable inverter generator, showcasingraças ao seu design compacto e painel de controle.
Principais características
- Capacidade de usar combustível duplo: Operates on both gasoline and propane for flexible power options.
- Tecnologia do inversor: Provides clean, stable power suitable for sensitive electronics.
- Multiple Start Options: Includes remote start, push-button electric start, and recoil start.
- CO Sentry: Automatically shuts off the generator if carbon monoxide levels become unsafe.
- Modo Econômico: Reduces engine speed to conserve fuel and lower noise during light loads.
- Capaz de paralelismo: Allows connection with another compatible unit to double power output.
- Mobility Kit: Alça e rodas integradas para facilitar o transporte.
- Digital Hour Meter: Tracks operating hours for maintenance scheduling.

Image: Visual representation of key features including parallel readiness, electric start button, and the super quiet operation of the generator.
Componentes do painel de controle
Familiarize yourself with the control panel before operation. Refer to the diagram below for component identification.

Image: Detailed diagram of the generator's control panel, labeling components such as Battery Switch, CO Sentry indicator, Electric Start, Fuel Source Switch, Economy Mode, LCD Switch, DC 12V 8A outlet, USB-A/USB-C ports, Parallel connectors, 20A AC120V outlets, 30A AC120V outlet, and Ground connection.
- Interruptor de bateria: Controls power to the electric start system.
- CO Sentry Indicator: Illuminates when CO levels are detected.
- Electric Start Button: Initiates engine start.
- Interruptor de fonte de combustível: Selects between gasoline and LPG (propane).
- Alternar para o Modo Econômico: Activates or deactivates economy mode.
- LCD Switch: Controls the digital display.
- Tomada DC 12V 8A: Para aparelhos de 12V DC.
- Portas USB-A e USB-C: Para carregar pequenos dispositivos eletrônicos.
- Conectores paralelos: For connecting two compatible generators.
- AC 120V Outlets (20A & 30A): For standard AC appliances.
- Terminal térreo: Para aterrar o gerador.
3. Configuração
Before first use, the generator requires some initial setup steps.
Desembalagem e inspeção
- Remove the generator and all accessories from the packaging.
- Inspect for any shipping damage. Contact customer support if damage is found.
- Ensure all included components are present: Handle & Wheels, Remote Control, Power Cord, User Manual.
Adicionando óleo do motor
The generator is shipped without engine oil. It is crucial to add the correct type and amount of oil before starting.
- Coloque o gerador em uma superfície nivelada.
- Remova a tampa de abastecimento de óleo / vareta medidora de nível.
- Adicione o óleo de motor recomendado (consulte as especificações para tipo e capacidade) até atingir a marca superior na vareta de medição. Não ultrapasse o nível máximo.
- Recoloque firmemente a tampa/vareta de medição do nível de óleo.
Conexão de Combustível
Este gerador funciona com gasolina ou propano.
Gasolina
- Certifique-se de que o gerador esteja desligado e frio.
- Abra a tampa do tanque de combustível.
- Fill with fresh, unleaded gasoline (minimum 87 octane) up to the fill neck, but do not overfill.
- Feche bem a tampa do tanque de combustível.
Propano (GLP)
- Connect the propane hose from the generator to a standard propane tank.
- Ensure all connections are tight and free of leaks. Use a soapy water solution to check for bubbles, indicating a leak.
- Abra a válvula do tanque de propano.
4. Instruções de operação
Siga estes passos para operar seu gerador de forma segura e eficaz.
Iniciando o gerador
The NE40BiSRCO offers three starting methods: Electric Start, Remote Start, and Recoil Start.

Image: Close-up of the electric start button and the remote start key fob, illustrating the convenient starting options.
General Starting Procedure (All Methods)
- Certifique-se de que o gerador esteja em uma superfície nivelada e em uma área externa bem ventilada.
- Verifique os níveis de óleo e combustível.
- Turn the Battery Switch to the 'ON' position. (Required for Electric and Remote Start).
- Select the desired fuel source (Gasoline or LPG) using the Fuel Source Switch.
- Ensure no electrical loads are connected to the generator.
Partida elétrica
- Follow General Starting Procedure steps 1-5.
- Press and hold the Electric Start button until the engine starts. Release immediately once started.
Início remoto
- Follow General Starting Procedure steps 1-5.
- Press the 'ON' button on the remote control. The generator will attempt to start.
Início de recuo
- Follow General Starting Procedure steps 1-5.
- Segure firmemente a alavanca de arranque retrátil.
- Pull the handle slowly until resistance is felt, then pull quickly and smoothly to start the engine. Repeat if necessary.
Conexão de cargas elétricas
- Once the engine is running and stable, you can connect your electrical devices.
- Always ensure the total wattagA potência dos dispositivos conectados não excede a potência de funcionamento do gerador.tage.
- For sensitive electronics, the inverter technology provides clean power.
Modo econômico
Activate Economy Mode by switching the Economy Mode switch to 'ON'. This reduces engine speed when loads are light, saving fuel and reducing noise. The engine will automatically rev up when more power is required.
Operação Paralela
The generator is parallel capable. To connect two compatible Pulsar inverter generators for increased power output, refer to the dedicated parallel kit instructions (sold separately).
Parando o gerador
- Desconecte todas as cargas elétricas.
- Gire a chave de ignição para a posição 'DESLIGADO'.
- Se estiver usando propano, feche a válvula do cilindro de propano.
- Turn the Battery Switch to the 'OFF' position.
5. Manutenção
Regular maintenance ensures optimal performance and extends the lifespan of your generator. The digital hour meter helps track operating hours for scheduled maintenance.
Cronograma de manutenção
| Item | Intervalo | Ação |
|---|---|---|
| Óleo do motor | Nas primeiras 20 horas, depois a cada 50 horas ou anualmente. | Check level, change oil |
| Filtro de ar | A cada 50 horas ou anualmente | Clean/Inspect |
| Vela de ignição | A cada 100 horas ou anualmente | Inspect, clean, or replace |
| Filtro de combustível | A cada 100 horas ou anualmente | Inspecione e substitua se necessário. |
Desligamento de baixo óleo
The generator is equipped with a low oil shutdown feature that automatically turns off the engine when oil levels are too low. This prevents engine damage. If the generator shuts down unexpectedly, check the oil level and refill if necessary.
Armazenar
For extended storage, especially when using gasoline, it is recommended to drain the fuel tank and carburetor or use a fuel stabilizer to prevent fuel degradation. Propane does not degrade over time, making it a suitable long-term fuel option.
6. Solução De Problemas
Esta seção fornece soluções para problemas operacionais comuns.
O motor não liga
- Sem combustível: Check gasoline and propane levels. Ensure the correct fuel source is selected.
- Baixo nível de óleo: Check engine oil level and add if low.
- Battery Dead (Electric/Remote Start): Ensure the 12V battery for electric start is charged.
- Vela de ignição: Inspecione a vela de ignição para verificar se há resíduos ou danos. Limpe ou substitua, se necessário.
- Válvula de combustível: Ensure the fuel valve (if applicable) is open. For propane, ensure the tank valve is open.
Sem saída de energia
- Sobrecarga: The generator may have been overloaded. Disconnect devices, turn off the generator, and restart. Reduce the load.
- Disjuntor: Check if any circuit breakers on the control panel have tripped. Reset if necessary.
- Modo Econômico: Ensure Economy Mode is not causing insufficient power for starting high-demand devices.
O motor funciona mal
- Stale Fuel: Use fresh gasoline. Drain old fuel if necessary.
- Filtro de ar: Um filtro de ar sujo pode restringir o fluxo de ar. Limpe ou substitua.
- Vela de ignição: Inspect and clean or replace the spark plug.
7. Especificações
Detailed technical specifications for the Pulsar NE40BiSRCO generator.

Image: Diagram showing the dimensions of the Pulsar NE40BiSRCO generator: 23 inches (L), 14.6 inches (W), and 20.9 inches (H).
| Especificação | Valor |
|---|---|
| Nome do modelo | NE40BiSRCO |
| Marca | Pulsar |
| Tipo de combustível | Gasolina, Gás Liquefeito de Petróleo (Propano) |
| Gasoline Peak Watts | 4000 W |
| Gasolina em Watts | 3200 W |
| Propane Peak Watts | 3600 W |
| Potência de funcionamento do propano | 2800 W |
| Deslocamento do motor | 141 cc |
| Fuel Capacity (Gasoline) | 1.66 galões |
| Tempo de execução (meia carga) | Até 6 horas |
| Volumetage | 120 Volts (CA) |
| Total de tomadas | 2 (AC 120V 20A, AC 120V 30A) + DC 12V 8A + USB-A/USB-C |
| Nível de ruído | 64 dB |
| Peso do item | 54.4 libras |
| Dimensões do produto (C x L x A) | 24" x 15" x 22" |
| Características especiais | CO Sentry, Dual Fuel, Portable, Remote Control, Super Quiet |
Referência Wattage for Appliances

Image: A table illustrating the typical running and starting wattages for various common household appliances, useful for load planning.
8. Why Dual Fuel and Inverter Technology

Image: Explanations of the advantages of dual fuel operation (security, longer service intervals with propane, propane bypasses carburetor, no expiration date for propane, quieter operation) and inverter technology (fuel efficiency, cleaner power, low noise level, portability).
Dual Fuel Advantages
- Fuel Flexibility: Use gasoline or propane based on availability or preference.
- Propane Storage: Propane has no expiration date, unlike gasoline, making it ideal for long-term storage.
- Cleaner Burning: Propane burns cleaner, leading to longer service intervals and less residue.
- Reduced Carburetor Issues: Propane bypasses the carburetor, reducing common fuel-related maintenance.
Inverter Technology Advantages
- Energia limpa: Produces a pure sine wave output, safe for sensitive electronics like laptops and smartphones.
- Eficiência de combustível: Automatically adjusts engine speed to match the load, consuming less fuel.
- Operação silenciosa: Generally quieter than conventional generators due to variable engine speed.
- Portabilidade: Often results in a more compact and lighter design.
9. Garantia e Suporte
Informações de garantia
This Pulsar generator comes with a Garantia do fabricante de 3 anos. Please retain your proof of purchase for warranty claims. For specific terms and conditions, refer to the warranty card included with your product or visit the official Pulsar website.
Suporte ao cliente
For technical assistance, parts, or warranty inquiries, please contact Pulsar customer support. You can find contact information in your included user manual or by visiting the Loja Pulsar na Amazon or the official Pulsar website.


