Introdução
This manual provides detailed instructions for the installation, operation, and maintenance of your CNBINGO MT-WK Rotary Knob Digital Room Thermostat. Please read this manual thoroughly before installation and use to ensure proper function and safety. This thermostat is designed to regulate the temperature of various heating systems, including electric heating, hot water heating, and water/gas boilers, ensuring a comfortable indoor climate.

Figure 1: CNBINGO MT-WK Rotary Knob Digital Room Thermostat with external sensor.
The CNBINGO MT-WK thermostat is a flush-mounted device featuring a rotary knob for temperature control and an integrated sensor, with an option for an external sensor. It supports a maximum current of 16A and voltage de 110-230V.
Informações de segurança
- A instalação deve ser realizada por um eletricista qualificado, de acordo com as normas elétricas locais.
- Desligue sempre a energia no disjuntor antes de instalar ou realizar manutenção no termostato.
- Do not expose the thermostat to water or excessive moisture. The device has an IP20 rating, suitable for indoor use.
- Certifique-se de que todas as conexões da fiação estejam seguras e devidamente isoladas para evitar curtos-circuitos.
- The thermostat housing is made of flame-retardant PC material for safety.
Produto acimaview
The CNBINGO MT-WK thermostat features a simple and intuitive design for temperature control.

Figure 2: Thermostat Components.
- PC Material: Durable and flame-retardant housing.
- LED de status: Indicates heating status (red when active).
- Controlador de temperatura: Rotary knob for setting and calibrating temperature.
- Interruptor liga/desliga: Slider switch to power the thermostat on or off.
- Exibição de temperatura: Scale around the rotary knob indicating the set temperature.
Configuração e instalação
1. Diagrama de Fiação
Refer to the following diagram for correct wiring connections. This thermostat is compatible with electric heating, hot water heating, and water/gas boiler systems.

Figure 3: Wiring Diagram and Compatible Devices.
- L: Live wire connection.
- N: Neutral wire connection.
- Sensor Externo: Connect the provided 3-meter external sensor cable if required.
2. Seleção de sensores
The thermostat includes both a built-in aluminum sensor and a 3-meter external temperature sensor. You can choose to use one or both depending on your specific needs.

Figure 4: Built-in vs. External Sensor Usage.
- Sensor incorporado: Ideal for smaller rooms where uniform temperature distribution is expected. The sensor is integrated directly into the thermostat unit.
- Sensor Externo: Recommended for larger rooms or areas where the thermostat's location might not accurately reflect the room's overall temperature. The 3-meter cable allows for flexible placement.
3. Requisitos de montagem
The thermostat is designed for flush-mounting in a standard wall box.

Figure 5: Product Dimensions and Wall Box Requirements.
- Dimensões: The thermostat measures 86mm x 86mm x 55mm.
- Wall Box: Mount in a standard wall box with a diameter of 60mm.
- Profundidade: The depth of the device box should be at least 35mm to accommodate the thermostat.
Instruções de operação
1. Ligar/desligar
Use the slider switch on the thermostat to turn the unit on or off.
2. Ajuste de Temperatura
To set the desired temperature, rotate the central knob. The temperature can be precisely set to 0.5°C increments within a range of 5°C to 40°C.
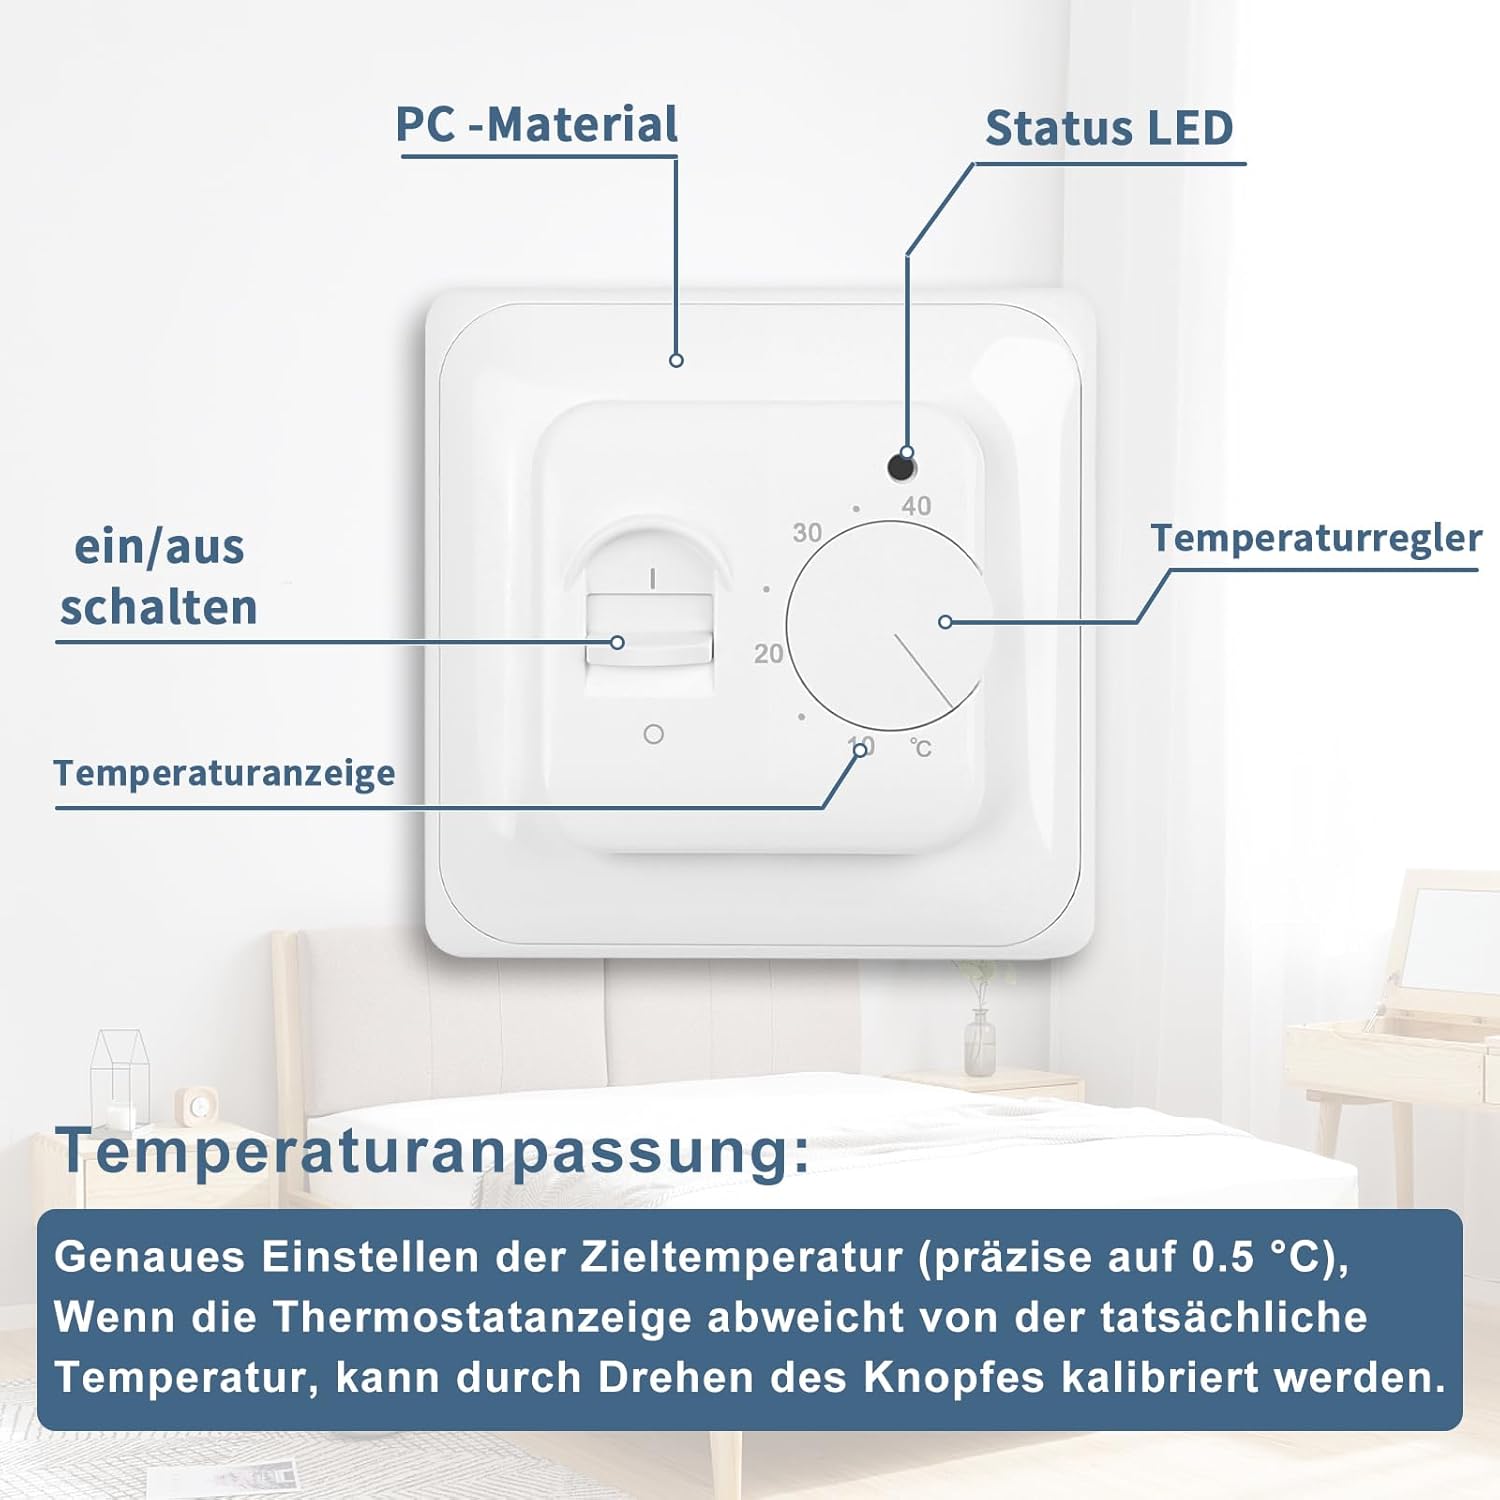
Figure 6: Temperature Adjustment Knob.
3. Calibração de Temperatura
If the temperature displayed on the thermostat deviates from the actual room temperature, you can calibrate it by gently turning the rotary knob until it matches the accurate reading from another thermometer.
4. Indicador LED
The thermostat is equipped with an LED indicator light that provides visual feedback on its operational status.

Figura 7: Indicador LED.
- LED vermelho: The LED lights up red when the heating system is actively engaged and providing heat.
- LED desligado: The LED is off when the heating system is not active or the thermostat is powered off.
Manutenção
The CNBINGO MT-WK thermostat requires minimal maintenance.
- Limpeza: Limpe a superfície do termostato com um pano macio e seco. Não utilize produtos de limpeza abrasivos ou solventes.
- Inspeção: Periodically check for any visible damage or loose connections. If any issues are found, consult a qualified electrician.
Solução de problemas
Se você tiver problemas com o seu termostato, consulte os problemas comuns e suas soluções a seguir:
- O termostato não liga:
- Check the main power supply to the thermostat.
- Ensure the on/off slider switch is in the 'on' position.
- Verifique se as conexões dos fios estão seguras.
- Heating not turning on:
- Certifique-se de que a temperatura definida seja superior à temperatura ambiente atual.
- Check if the red LED indicator is lit. If not, the thermostat is not calling for heat.
- Verify the heating system (boiler, electric heater) is operational.
- Leitura de temperatura incorreta:
- Calibrate the thermostat by adjusting the rotary knob to match a known accurate thermometer.
- Ensure the sensor (internal or external) is not obstructed or exposed to drafts/direct sunlight.
Especificações
| Recurso | Especificação |
|---|---|
| Número do modelo | MT-WK |
| Volumetage | 110-230 Volts (CA) |
| Max atual | 16A |
| Tipo de fonte de alimentação | AC |
| Faixa de controle de temperatura | 5°C - 40°C |
| Precisão da temperatura | 0.5°C |
| Sensores | Built-in aluminum sensor, 3m external sensor |
| Classificação de proteção | IP20 |
| Dimensões do produto (C x L x A) | 8.3 x 8.3 x 5.5 cm |
| Peso | 0.2 quilos |
| Cor | Branco |
Garantia e Suporte
For warranty information or technical support, please contact CNBINGO customer service. Refer to your purchase documentation for specific warranty terms.
Fabricante: CNBINGO
Modelo: MT-WK
For further assistance, please visit the official CNBINGO webou entre em contato com seu distribuidor local.