1. Produto acabadoview
The TOTAL TIDLI20558 is a compact brushless cordless impact drill designed for various drilling and fastening applications. It features a powerful 20V motor, delivering up to 55Nm of torque, making it suitable for both professional and DIY tasks. This drill combines durability with an ergonomic design for comfortable and efficient operation.
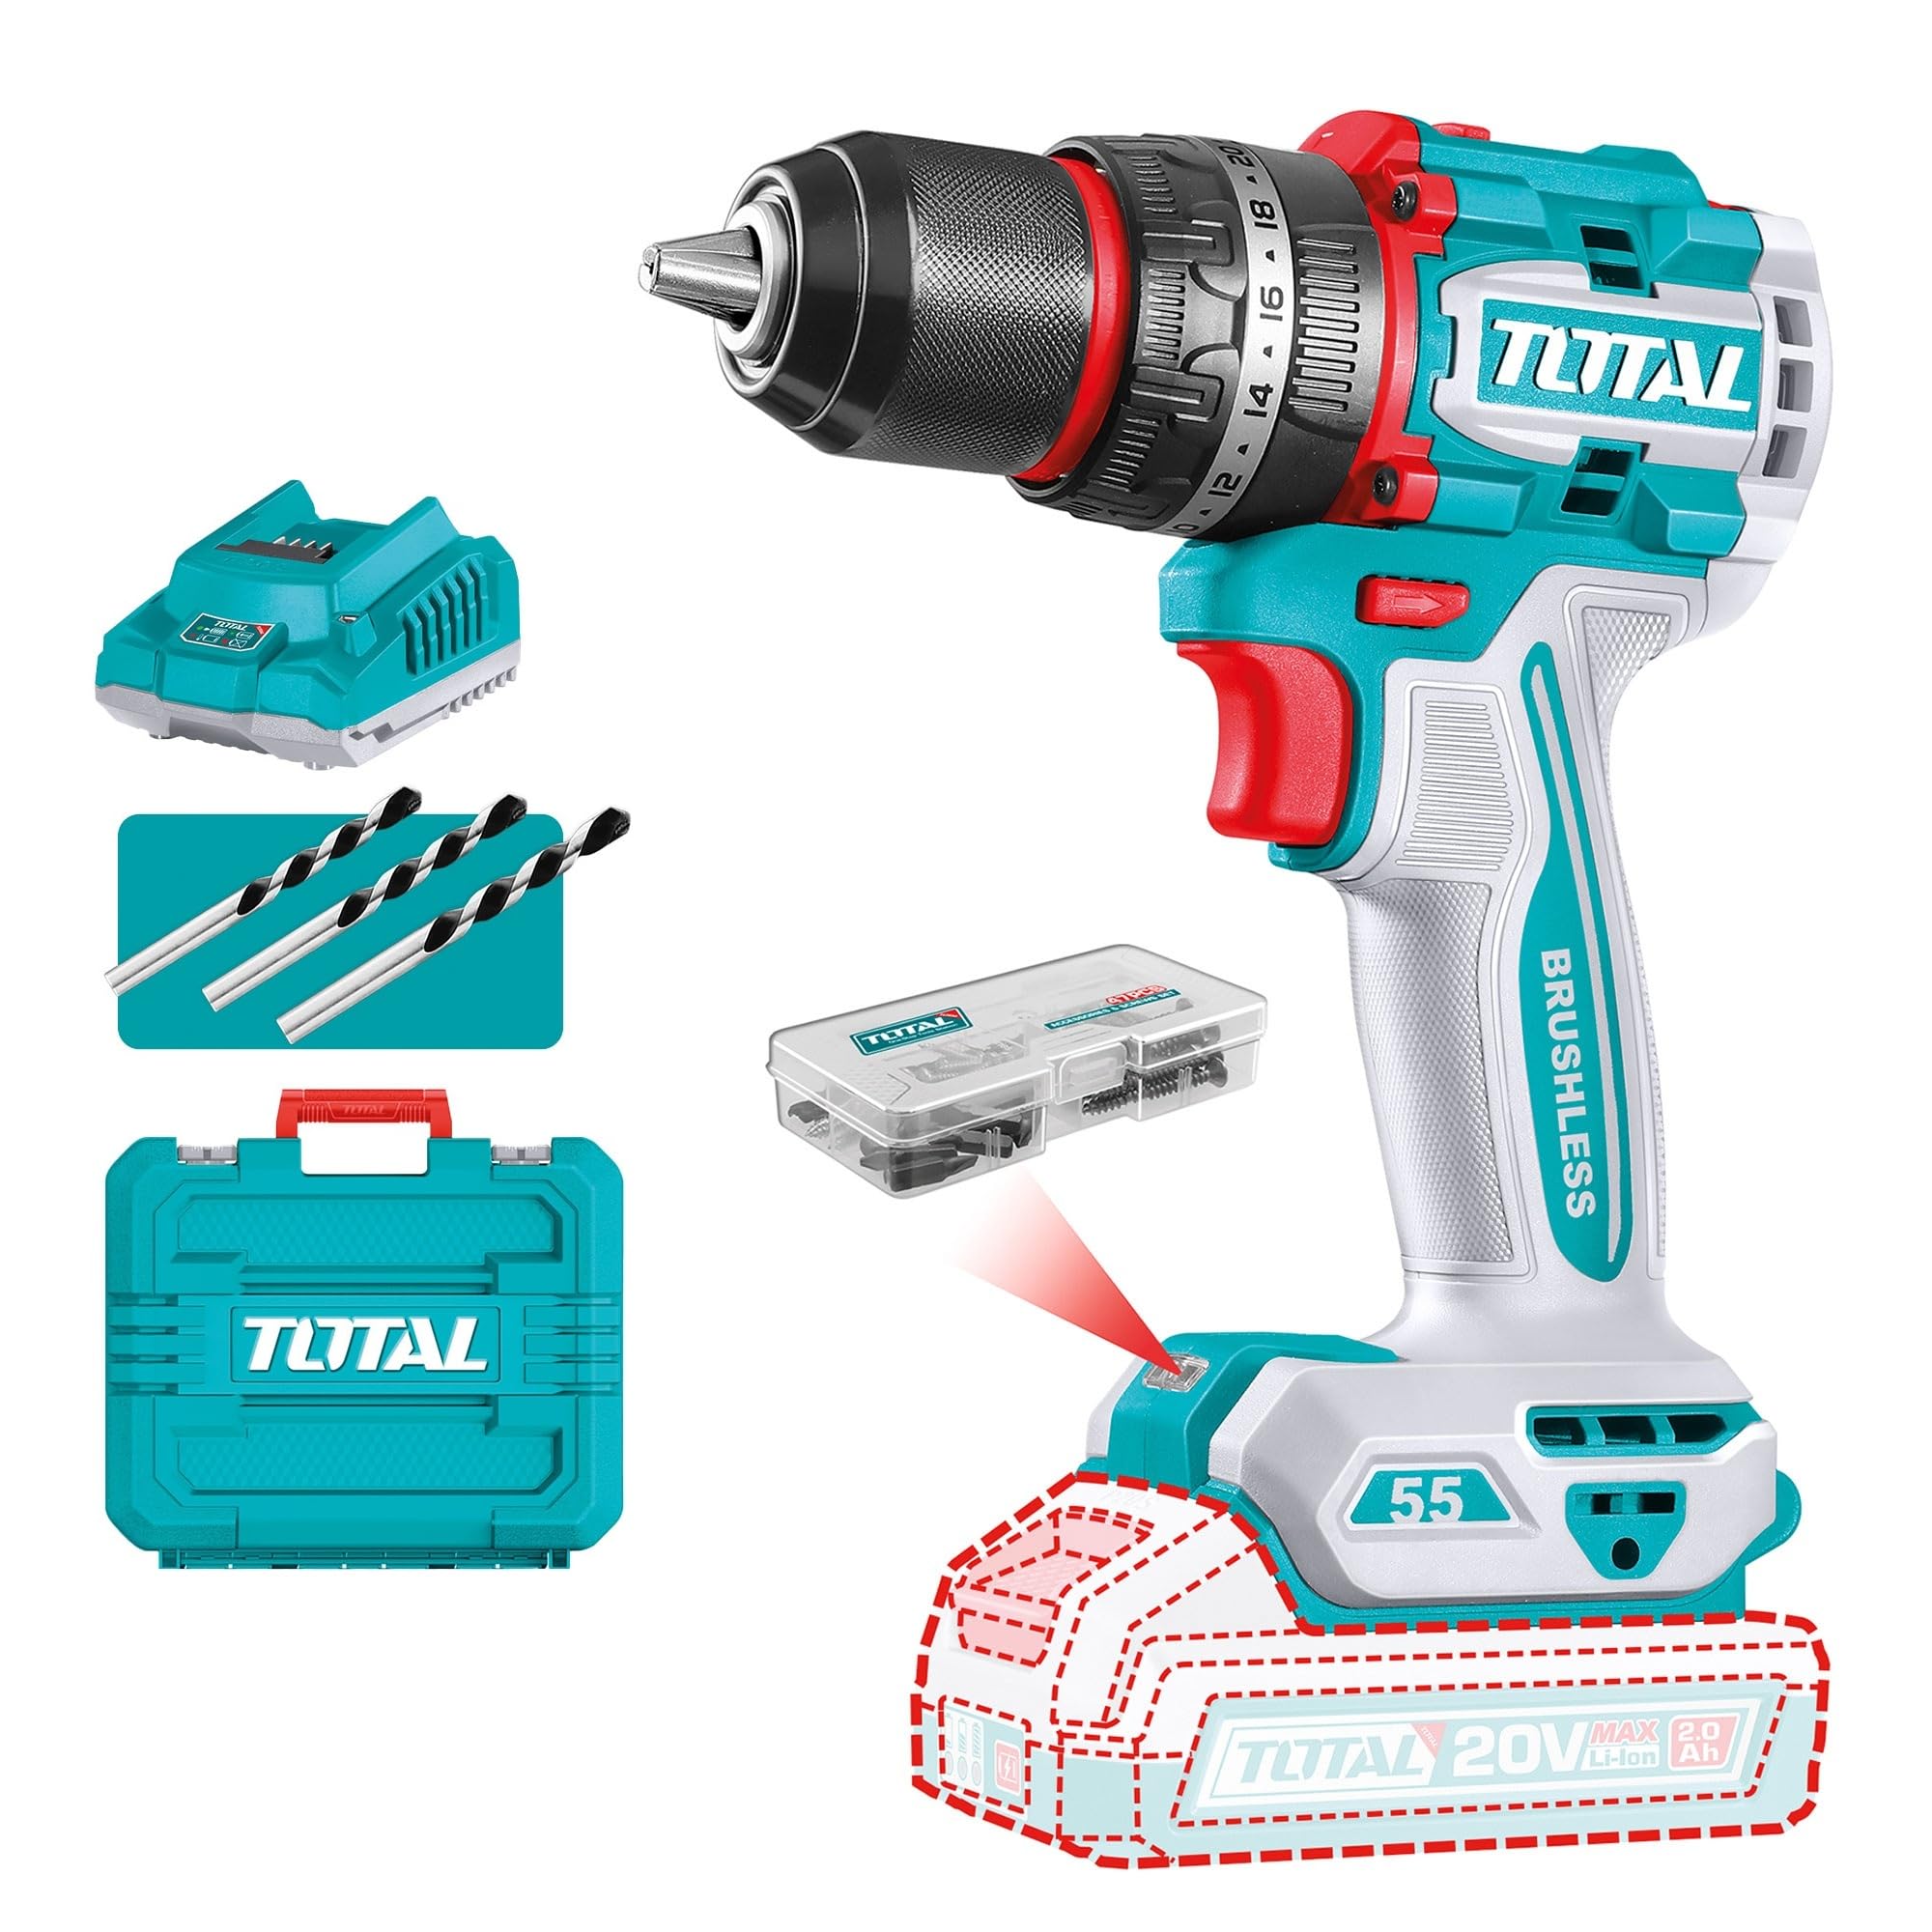
Figure 1: TOTAL TIDLI20558 Compact Brushless Cordless Impact Drill. This image displays the drill unit with a battery attached, showcasingraças ao seu design compacto e corpo principal.
2. Instruções de segurança
Sempre observe as precauções básicas de segurança ao usar ferramentas elétricas para reduzir o risco de incêndio, choque elétrico e ferimentos pessoais.
- Segurança da Área de Trabalho: Mantenha sua área de trabalho limpa e bem iluminada. Áreas desorganizadas ou escuras são propícias a acidentes. Não opere ferramentas elétricas em atmosferas explosivas, como na presença de líquidos, gases ou poeira inflamáveis.
- Segurança elétrica: Evite o contato do corpo com superfícies aterradas, como canos, radiadores, fogões e geladeiras. Não exponha ferramentas elétricas à chuva ou umidade.
- Segurança pessoal: Use sempre proteção ocular. Use protetores auriculares ao operar a furadeira por períodos prolongados. Vista-se adequadamente; evite roupas largas ou joias. Prenda o cabelo comprido.
- Uso e cuidados com a ferramenta: Não force a ferramenta elétrica. Use a ferramenta elétrica correta para a sua aplicação. Desconecte a bateria da ferramenta elétrica antes de fazer ajustes, trocar acessórios ou guardar ferramentas elétricas.
- Segurança da bateria: Recharge only with the charger specified by the manufacturer. Do not use battery packs with any other power tools. Do not incinerate the battery pack even if it is severely damaged.
3. Componentes
Familiarize yourself with the main components of your TOTAL TIDLI20558 impact drill:
- Mandril: Armazena brocas e outros acessórios.
- Anel de ajuste de torque: Allows selection of desired torque setting for screwdriving.
- Seletor de modo: Alterna entre os modos de perfuração, perfuração com impacto e aparafusamento.
- Interruptor seletor de velocidade: Controls the high/low speed range.
- Interruptor de gatilho: Ativa a furadeira e controla a velocidade variável.
- Seletor de marcha à frente/ré: Altera o sentido de rotação do mandril.
- Luz de trabalho LED: Ilumina a área de trabalho.
- Bateria: Fornece energia à furadeira.
- Botão de liberação da bateria: Used to detach the battery pack.
- Lidar: Ergonomic grip for user comfort.
4. Configuração
4.1. Instalação e carregamento da bateria
- Carregamento: Connect the charger to a power outlet. Slide the battery pack onto the charger until it clicks into place. The indicator light on the charger will show the charging status. Ensure the battery is fully charged before first use.
- Instalação: Align the battery pack with the base of the drill handle. Slide the battery pack into the drill until it clicks securely into place. Ensure it is firmly seated before operation.
- Remoção: Press the battery release button located on the battery pack and slide the battery out of the drill handle.
4.2. Instalação e remoção de brocas/acessórios
- Instalação: Rotate the chuck counter-clockwise to open the jaws. Insert the drill bit or accessory fully into the chuck. Rotate the chuck clockwise to tighten the jaws securely around the bit. Ensure the bit is centered and firmly held.
- Remoção: Rotate the chuck counter-clockwise to loosen the jaws and remove the drill bit or accessory.
5. Instruções de operação
5.1. Ligar/Desligar e Controle de Velocidade
- Para ligar: Press the trigger switch. The drill speed is variable depending on how far the trigger is pressed.
- Para desligar: Solte o gatilho.
- Seletor de velocidade: Use the speed selector switch (typically on top of the drill) to choose between low speed (for high torque applications like screwdriving) and high speed (for drilling).
5.2. Rotação para frente/para trás
The forward/reverse selector switch is located above the trigger. Push it to the left for forward rotation (drilling/tightening) and to the right for reverse rotation (removing screws/backing out bits). Ensure the drill is completely stopped before changing direction.
5.3. Mode Selection (Drilling, Impact, Screwdriving)
Rotate the mode selector ring to choose the appropriate setting:
- Modo de perfuração: Para perfurar madeira, metal e plástico.
- Modo de perfuração por impacto: For drilling into masonry and concrete (if applicable to this model's capabilities).
- Modo de aparafusamento: Use with the torque adjustment ring to prevent over-tightening screws.
5.4. Ajuste de torque
In screwdriving mode, rotate the torque adjustment ring to select the desired torque level. Lower numbers indicate lower torque for smaller screws or softer materials, while higher numbers provide more torque for larger screws or harder materials. The drill will stop driving when the selected torque is reached.
6. Manutenção
6.1. Limpeza
- Regularly clean the ventilation openings of the drill to prevent overheating.
- Use um pano macio e macioamp Use um pano para limpar a parte externa da ferramenta. Não utilize produtos químicos agressivos ou abrasivos.
- Keep the chuck jaws free from dust and debris to ensure proper bit gripping.
6.2. Armazenamento
- Guarde a furadeira e as baterias em local fresco e seco, longe da luz solar direta e da umidade.
- Ensure the battery pack is partially charged (around 50%) before long-term storage to prolong its lifespan.
- Armazene fora do alcance de crianças.
6.3. Cuidados com a bateria
- Não exponha as baterias a temperaturas extremas ou calor direto.
- Evite descarregar completamente a bateria com frequência, pois isso pode reduzir sua vida útil.
- If the battery pack is not used for an extended period, recharge it every 3-6 months.
7. Solução De Problemas
| Problema | Possível causa | Solução |
|---|---|---|
| A furadeira não inicia. | Bateria não carregada ou instalada incorretamente. | Certifique-se de que a bateria esteja totalmente carregada e corretamente encaixada. |
| Perda de energia durante o funcionamento. | A carga da bateria está baixa. | Recarregue a bateria. |
| A broca escorrega no mandril. | O mandril não está suficientemente apertado ou as garras estão sujas. | Tighten chuck firmly. Clean chuck jaws if necessary. |
| Superaquecimento. | Orifícios de ventilação obstruídos ou uso intenso e contínuo. | Clear ventilation slots. Allow the tool to cool down. Reduce load. |
8. Especificações
| Recurso | Detalhe |
|---|---|
| Número do modelo | TIDLI20558 |
| Volumetage | 20 Volts |
| Torque máximo | 55 Newton Metros |
| Fonte de energia | Alimentado por bateria |
| Tipo de motor | Sem escova |
| Peso do item | 3 quilos |
| Dimensões do produto | 46 x 33 x 14 cm |
| Material | Metal |
| Componentes incluídos | Drill Attachment (typically includes 2 batteries and charger as per product title) |
9. Garantia e Suporte
For warranty information, technical support, or service inquiries, please refer to the warranty card included with your product or contact TOTAL customer service. Keep your purchase receipt as proof of purchase for warranty claims.
Nota: Os termos e condições específicos da garantia podem variar conforme a região.


