Introdução
Obrigado pela compra.asing the Argon Audio TT MK2 Turntable. This manual provides essential information for the safe and optimal operation, setup, and maintenance of your new turntable. Please read this manual thoroughly before using the product and retain it for future reference.
The Argon Audio TT MK2 is designed to deliver high-fidelity audio playback from your vinyl records, featuring a built-in phono pre-amplifier, an Audio Technica AT3600 cartridge, and dual-speed control for 33 and 45 RPM records.
Instruções importantes de segurança
Para reduzir o risco de choque elétrico, incêndio ou danos ao aparelho, observe as seguintes precauções de segurança:
- Não exponha este aparelho à chuva ou umidade.
- Não coloque objetos com líquidos, como vasos, sobre o aparelho.
- Não obstrua as aberturas de ventilação. Instale de acordo com as instruções do fabricante.
- Não instale perto de fontes de calor, como radiadores, registros de calor, fogões ou outros aparelhos (incluindo amplificadores) que produzem calor.
- Proteja o cabo de alimentação de pisadelas ou apertos, especialmente nos plugues, receptáculos de conveniência e no ponto de onde eles saem do aparelho.
- Utilize somente acessórios/anexos especificados pelo fabricante.
- Desligue este aparelho durante tempestades com raios ou quando não for utilizado por longos períodos de tempo.
- Entregue todos os serviços de manutenção a pessoal de serviço qualificado. O serviço é necessário quando o aparelho foi danificado de alguma forma, como cabo de alimentação ou plugue danificado, líquido foi derramado ou objetos caíram no aparelho, o aparelho foi exposto à chuva ou umidade, não opera normalmente ou foi derrubado.
O que está na caixa
Carefully unpack all components and ensure all items are present before discarding packaging materials:
- Argon Audio TT MK2 Turntable Unit
- Audio Technica AT3600 Cartridge (pre-mounted)
- Dust Lid
- Cabo RCA
- Adaptador de energia
- Contrapeso
- Peso antiderrapante
- Platter and Drive Belt
- Tapete de feltro

Image: The Argon Audio TT MK2 Turntable with its clear dust cover in place, showcasing its sleek black finish.
Guia de configuração
1. Localização
Place the turntable on a stable, level surface away from direct sunlight, heat sources, and strong vibrations. Ensure there is enough space around the unit for ventilation and operation.
2. Instalação do prato e da correia
- Carefully place the metal platter onto the spindle.
- Locate the drive belt. Gently stretch the belt around the inner rim of the platter and hook it onto the motor pulley. Ensure the belt is not twisted.
- Coloque o tapete de feltro em cima do prato.

Image: The Argon Audio TT MK2 Turntable with its dust cover removed, showing the platter and tonearm assembly.
3. Cartridge and Tonearm Setup
The Audio Technica AT3600 cartridge comes pre-mounted on the tonearm. Follow these steps to balance the tonearm and set the tracking force:
- Remova a proteção da caneta do cartucho.
- Gently release the tonearm from its rest.
- Rotate the counterweight at the rear of the tonearm until the tonearm floats freely and is perfectly balanced horizontally.
- Once balanced, hold the counterweight steady and rotate the numbered ring on the front of the counterweight to "0".
- Rotate the entire counterweight (including the numbered ring) counter-clockwise until the desired tracking force is set. For the AT3600 cartridge, the recommended tracking force is typically 3.5 grams.

Imagem: Um close-up view of the tonearm's counterweight and anti-skate mechanism, showing the numerical scale for adjustment.
4. Anti-Skate Adjustment
Attach the anti-skate weight to the small loop on the tonearm and hang it over the second groove of the anti-skate support rod. This helps prevent the stylus from skipping inwards.
5. Conectando ao sistema de áudio
The TT MK2 features a built-in phono pre-amplifier, allowing direct connection to powered speakers or an amplifier's line-level input. If your amplifier has a dedicated "Phono" input, you can bypass the internal pre-amp.
- Connect the supplied RCA cable from the "RCA OUT" jacks on the rear of the turntable to the corresponding input on your amplifier or powered speakers (e.g., "AUX", "LINE IN").
- Locate the "RIAA" switch on the rear of the turntable.
- Set the switch to "ON" if connecting to a line-level input (e.g., AUX, CD) on your amplifier or directly to powered speakers. This activates the internal phono pre-ampmais vivo.
- Set the switch to "OFF" if connecting to a dedicated "Phono" input on your amplifier. This bypasses the internal phono pre-amplifier, as your amplifier will provide the necessary RIAA equalization.

Image: The rear panel of the Argon Audio TT MK2 Turntable, showing the RCA output jacks, the RIAA (Phono/Line) switch, and the DC 12V power input.
6. Conexão de energia
Connect the supplied power adapter to the "DC IN 12V" port on the rear of the turntable, then plug the adapter into a wall outlet.
Instruções de operação
1. Ligar / desligar
Use the power switch located on the rear panel to turn the turntable ON or OFF.
2. Selecionando a velocidade de reprodução
The TT MK2 supports two playback speeds: 33 1/3 RPM for LPs and 45 RPM for singles. Use the speed selection knob on the top right of the turntable to switch between "33" and "45".
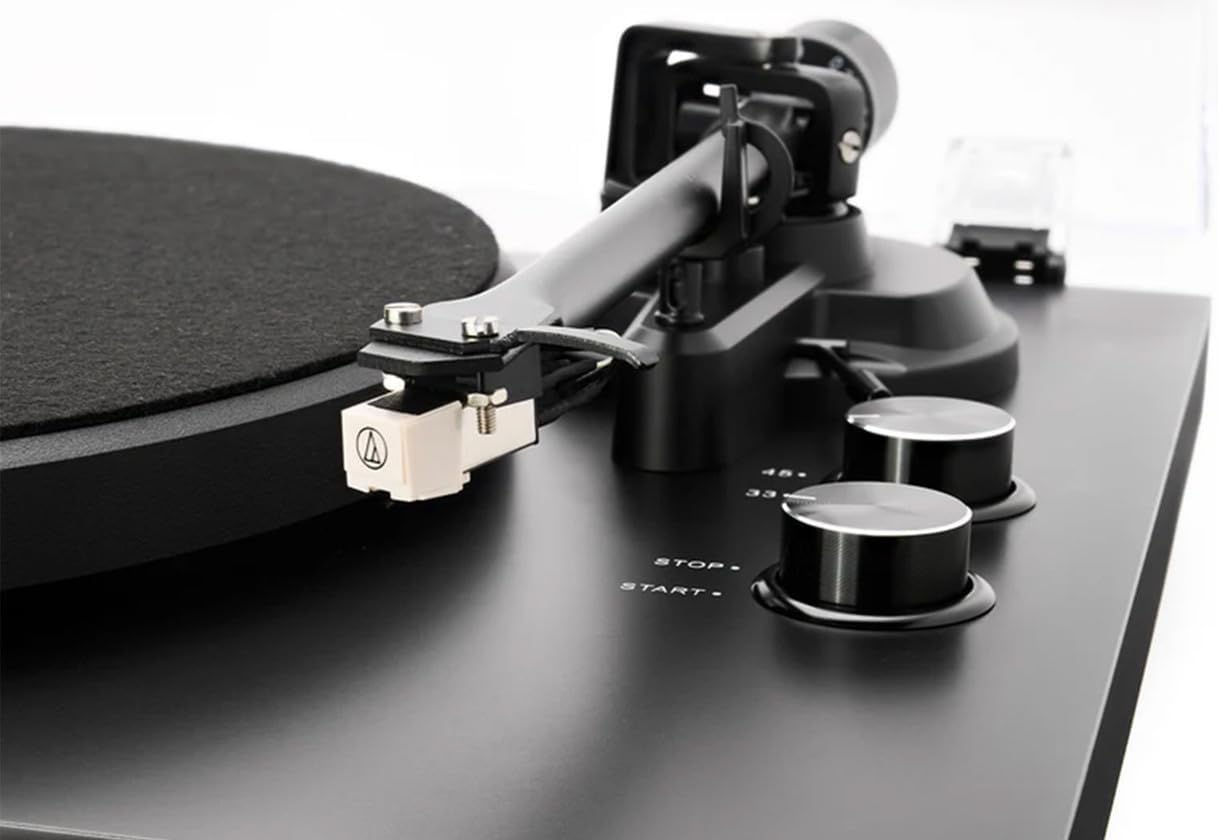
Image: A close-up of the Audio Technica AT3600 cartridge mounted on the tonearm, alongside the "STOP" and "START" buttons and the 33/45 RPM speed selection knob.
3. Tocando um disco
- Coloque o disco no prato, certificando-se de que esteja centralizado.
- Select the correct speed (33 or 45 RPM) using the speed knob.
- Press the "START" button. The platter will begin to rotate.
- Levante cuidadosamente o braço do toca-discos usando a alavanca de elevação.
- Posicione o braço do toca-discos sobre o sulco inicial desejado do disco.
- Abaixe lentamente a alavanca de posicionamento para que a agulha coloque suavemente sobre o disco.
4. Parando a reprodução
- At the end of a record, the tonearm will not automatically return. Gently lift the tonearm using the cueing lever.
- Recoloque o braço fonocaptor em seu repouso e prenda-o com a presilha.
- Press the "STOP" button to halt platter rotation.
- Carefully remove the record.
Manutenção
1. Limpeza da agulha
The stylus (needle) should be cleaned regularly to ensure optimal sound quality and prevent damage to your records. Use a soft brush designed for stylus cleaning, brushing gently from back to front (away from the cantilever).
2. Limpeza de Registros
Always handle records by their edges. Use a carbon fiber brush or a dedicated record cleaning solution and cloth to remove dust and debris before each play.
3. Limpeza do prato giratório
Wipe the turntable chassis and dust cover with a soft, dry, lint-free cloth. For stubborn marks, a slightly damp Pode-se usar um pano úmido, seguido de um pano seco. Evite usar produtos químicos agressivos ou produtos de limpeza abrasivos.
4. Cuidados com a capa protetora contra poeira
The dust cover protects your turntable from dust. When not in use, keep the dust cover closed. Clean it gently with a soft, damp cloth to avoid scratching the acrylic surface.
Solução de problemas
If you experience issues with your Argon Audio TT MK2 Turntable, please consult the following table before contacting support:
| Problema | Possível causa | Solução |
|---|---|---|
| Sem som ou som muito baixo |
|
|
| Som distorcido ou abafado |
|
|
| Prato não gira |
|
|
| Speed issues (too fast/slow) |
|
|
Especificações
| Recurso | Detalhe |
|---|---|
| Nome do modelo | TT MK2 |
| Marca | Argon Audio |
| Dimensões (L x P x A) | 42 x 35 x 12 cm |
| Peso do item | 4.5 kg |
| Material | Engineered Wood, Aluminium |
| Cor | Preto |
| Cartucho | Audio Technica AT3600 (pre-fitted) |
| Phono Pré-amp | Built-in, switchable (RIAA ON/OFF) |
| Velocidades de rotação | 33 1/3 RPM, 45 RPM (electronic speed selection) |
| Conectividade | Saída RCA |
| Componentes incluídos | Turntable, Audio Technica AT3600 Cartridge, Dust Lid, RCA Cable, Power Adapter |
| Fabricante | Argon Audio |
| País de origem | Dinamarca |
Garantia e Suporte
Argon Audio products are designed and manufactured to the highest quality standards. This product is covered by a manufacturer's warranty. Please refer to the warranty card included with your product or visit the official Argon Audio website para obter termos e condições detalhados da garantia.
For technical support, troubleshooting assistance beyond this manual, or warranty claims, please contact your authorized Argon Audio dealer or Argon Audio customer service directly. Contact information can typically be found on the Argon Audio website.


