1. Introdução
Thank you for choosing the Novodesk AZ5130 6-in-1 Automatic Vacuum Sealer Machine. This manual provides essential information for the safe and efficient operation, maintenance, and troubleshooting of your new appliance. Please read these instructions thoroughly before first use and retain them for future reference.

Image 1.1: The Novodesk AZ5130 Vacuum Sealer in operation, sealing food for preservation.
2. Instruções importantes de segurança
Ao usar aparelhos elétricos, precauções básicas de segurança devem sempre ser seguidas para reduzir o risco de incêndio, choque elétrico e ferimentos às pessoas, incluindo o seguinte:
- Leia todas as instruções antes de usar este aparelho.
- Do not operate the appliance with a damaged power cord or plug. If the cord or plug is damaged, contact customer support for assistance.
- Não mergulhe o aparelho, o cabo de alimentação ou a ficha em água ou outros líquidos.
- Este aparelho não se destina ao uso por pessoas (incluindo crianças) com capacidades físicas, sensoriais ou mentais reduzidas, ou com falta de experiência e conhecimento, a menos que tenham recebido supervisão ou instruções sobre o uso do aparelho de uma pessoa responsável por sua segurança.
- É necessária supervisão rigorosa quando qualquer aparelho for usado por crianças ou perto delas.
- Desligue da tomada quando não estiver em uso e antes de limpar. Deixe esfriar antes de colocar ou retirar peças e antes de limpar o aparelho.
- Não utilize acessórios não recomendados pelo fabricante.
- Não utilize ao ar livre.
- Não coloque sobre ou perto de um queimador a gás ou elétrico quente, nem em um forno aquecido.
- Always ensure the lid is properly latched before operating.
- Use only vacuum sealer bags designed for vacuum sealing.
3. Conteúdo da embalagem
Carefully unpack your Novodesk AZ5130 Vacuum Sealer and check that all items are present and in good condition. If any items are missing or damaged, please contact customer support.
- 1 x Novodesk AZ5130 Vacuum Sealer Machine
- 1 x Cabo de alimentação
- 1 x Vacuum Hose (for external vacuuming)
- 2 x Sealing Foam Gaskets (replacement)
- 6 x Pre-cut Vacuum Bags (3.9" x 7.8")
- 6 x Pre-cut Vacuum Bags (7.8" x 11.8")

Image 3.1: All components included in the Novodesk AZ5130 Vacuum Sealer package.
4. Produto acabadoview
Familiarize yourself with the various parts and functions of your vacuum sealer.

Image 4.1: Control panel and function buttons of the vacuum sealer.
Funções do painel de controle:
- Process Indicator Light: Illuminates to show operating status.
- Modo Seco: For vacuum sealing dry foods like nuts and grains.
- Modo Úmido: For vacuum sealing foods with a small amount of liquid.
- Função de pulso: Allows manual control of the vacuum process, ideal for fragile foods.
- Seal Function: Seals bags without vacuuming.
- Botão de parada: Interrompe a operação atual.
Image 4.2: Internal components of the vacuum sealer.
Componentes principais:
- Câmara de vácuo: Área por onde o ar é removido da bolsa.
- Silicone Strip: Helps create a tight seal.
- Fita selante: Heats to create the bag seal (4mm wide).
- Foam Seal Ring: Ensures proper vacuum.
- Cover Slaps: Prevents the vacuum bag from coming out of the vacuum chamber.
- External Sliding Cutter: Integrated cutter for custom bag sizes.
- External VAC Port: For connecting the vacuum hose to jars and containers.
5. Configuração
Before first use, ensure the appliance is clean and dry. Place the vacuum sealer on a flat, stable surface.
Etapas de configuração inicial:
- Connect the power cord to the appliance and then to a suitable electrical outlet.
- Prepare your vacuum bag with food, ensuring the open end is clean and dry. Leave at least 2-3 inches of space between the food and the top of the bag.
6. Instruções de operação
6.1. Basic Vacuum Sealing (Dry & Moist Modes)
Follow these steps for standard vacuum sealing of food bags:
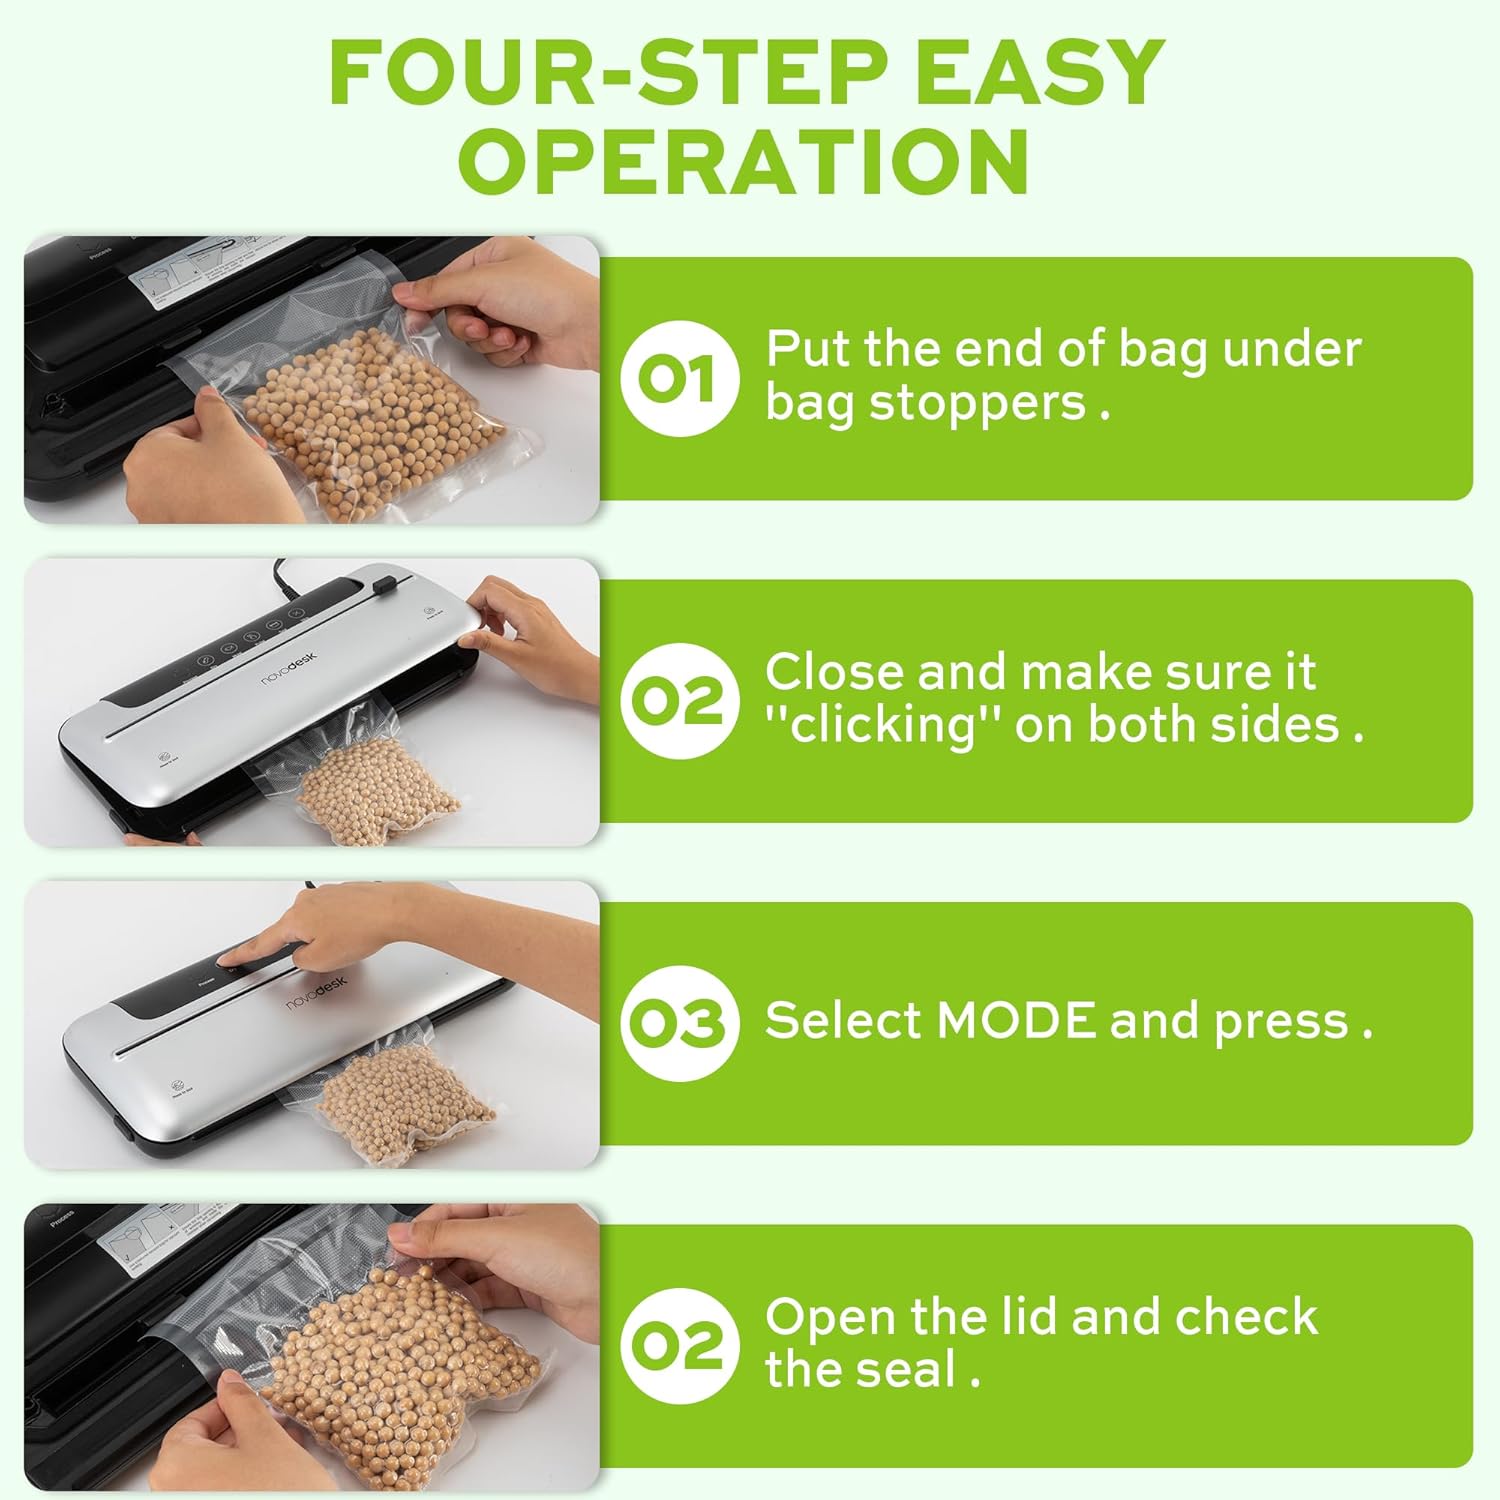
Image 6.1: Four-step easy operation for vacuum sealing.
- Prepare a bolsa: Place the open end of the vacuum bag under the bag stoppers, ensuring it is flat and centered within the vacuum chamber.
- Feche a tampa: Firmly close the lid of the vacuum sealer. Press down on both sides until you hear a "clicking" sound, indicating that the lid is securely latched.
- Modo de seleção: Choose the appropriate mode for your food:
- Pressione o Seco button for dry foods.
- Pressione o Úmido button for moist foods.
- Verifique o selo: Once the process is complete and the indicator light turns off, open the lid and remove the sealed bag. Inspect the seal to ensure it is airtight.
6.2. Função de pulso
The Pulse function provides manual control over the vacuum process, which is ideal for delicate or fragile foods that could be crushed by full vacuum pressure.
- Follow steps 1 and 2 from "6.1. Basic Vacuum Sealing".
- Pressione e segure o Pulso button. The machine will begin to vacuum.
- Solte o Pulso button when the desired vacuum level is reached.
- Pressione o Selo botão para fechar o saco.
- Abra a tampa e retire o saco lacrado.
6.3. Seal Only Function
Use the Seal function to create a seal without vacuuming, useful for making custom-sized bags from a roll or resealing snack bags.
- Coloque a extremidade aberta do saco na tira de vedação.
- Close the lid firmly until it clicks.
- Pressione o Selo botão. A máquina irá aquecer e selar o saco.
- Após a conclusão do processo de selagem, abra a tampa e retire o saco selado.
6.4. External Vacuum Function (for Jars/Containers)
Your vacuum sealer includes an external vacuum hose for use with compatible vacuum-sealable jars, containers, and wine stoppers.

Image 6.2: Using the external vacuum system with various containers.
- Prepare your vacuum-sealable jar or container with food. Ensure the lid is properly placed.
- Insert one end of the vacuum hose into the external VAC port on the vacuum sealer.
- Insert the other end of the vacuum hose into the port on your vacuum-sealable jar or container.
- Close the lid of the vacuum sealer (no bag needed inside).
- Pressione o External VAC button (if available, otherwise use Dry/Moist mode to activate vacuum pump). The machine will begin to remove air from the container.
- Once the vacuum process is complete, remove the hose. The container should now be sealed.
6.5. Using the External Sliding Cutter
The integrated sliding cutter allows you to create custom-sized bags from a roll of vacuum sealer material.
- Place the vacuum bag roll across the cutting area.
- Slide the cutter blade across the bag material to achieve the desired length.
7. Manutenção e Limpeza
A limpeza e a manutenção regulares garantirão a longevidade e o desempenho ideal da sua seladora a vácuo.
Instruções de limpeza:
- Desligue sempre o aparelho da tomada antes de limpá-lo.
- Limpe o exterior da máquina com um pano macio e úmidoamp pano. Não use produtos de limpeza abrasivos ou solventes.
- Limpe a câmara de vácuo e a área da fita de vedação com um produto de limpeza.amp pano. Certifique-se de que não restem partículas de alimentos ou líquidos.
- The foam seal rings can be removed for cleaning if necessary. Wash with mild soap and water, rinse thoroughly, and allow to air dry completely before reinserting.
- Certifique-se de que todas as peças estejam completamente secas antes de guardar ou usar o aparelho novamente.
Armazenar:
Store the vacuum sealer in a clean, dry place. For best results, store with the lid unlatched to prevent compression of the foam seal rings, which can affect sealing performance over time.
8. Solução De Problemas
Se você encontrar problemas com sua seladora a vácuo, consulte os problemas comuns e suas soluções a seguir:
| Problema | Possível causa | Solução |
|---|---|---|
| A máquina não liga. | Sem fonte de alimentação. | Verifique se o cabo de alimentação está firmemente conectado à tomada e ao aparelho. Teste a tomada com outro aparelho. |
| A máquina aspira, mas não sela. | Sealing strip or foam gasket is dirty/damaged. Bag is not positioned correctly. | Clean the sealing strip and foam gaskets. Ensure the bag is flat and centered over the sealing strip. Replace gaskets if damaged. |
| A máquina sela, mas não faz vácuo. | Lid not properly latched. Foam gaskets are dirty or worn. Bag has holes or is not suitable. | Ensure the lid is firmly closed and latched on both sides. Clean or replace foam gaskets. Use proper vacuum sealer bags and check for damage. |
| O vácuo é fraco ou inconsistente. | Foam gaskets are dirty or worn. Too much liquid in the bag (for Dry mode). | Clean or replace foam gaskets. Use Moist mode for foods with liquid, or pre-freeze liquids. |
| Bag melts during sealing. | Sealing time too long (unlikely for automatic models). | Ensure you are using appropriate vacuum sealer bags. If issue persists, contact customer support. |
If the problem persists after attempting these solutions, please contact Novodesk customer support for further assistance.
9. Especificações
| Marca | Novodesk |
| Número do modelo | AZ5130 |
| Potência / Wattage | 120 watts |
| Volumetage | 120V |
| Material | Acrilonitrila Butadieno Estireno (ABS) |
| Peso do item | 980 g (2.16 libras) |
| Cor | Prateado |
| Modo de operação | Automático |
| Potência máxima de sucção | 75 KPa |
| Largura da tira de vedação | 4 mm |
10. Garantia e Suporte
Novodesk products are manufactured to high-quality standards. For information regarding warranty coverage, product support, or to purchase replacement parts, please refer to the warranty card included with your product or visit the official Novodesk website. If you have any questions or require assistance, please contact Novodesk customer service.

