1. Introdução
Thank you for choosing the MYPIN Cordless Electric Pressure Washer. This manual provides essential information for the safe and effective use of your new pressure washer. Please read it thoroughly before operation and keep it for future reference.
Conteúdo da embalagem
Verify that all items listed below are included in your package. If any parts are missing or damaged, please contact customer support.
- Handheld Pressure Washer x 1
- Plugue de carregamento x 1
- Faucet Connector x 1
- Bocal 6 em 1 x 1
- Foam Bottle x 1
- 13L/3.4 Gallon Water Tank x 1
- Bucket Wheels x 4
- Quick Connector x 1
- 7M/275 inch Water Tank Hose x 1
- 5M/196 inch PVC Faucet Hose x 1
- Manual do usuário x 1
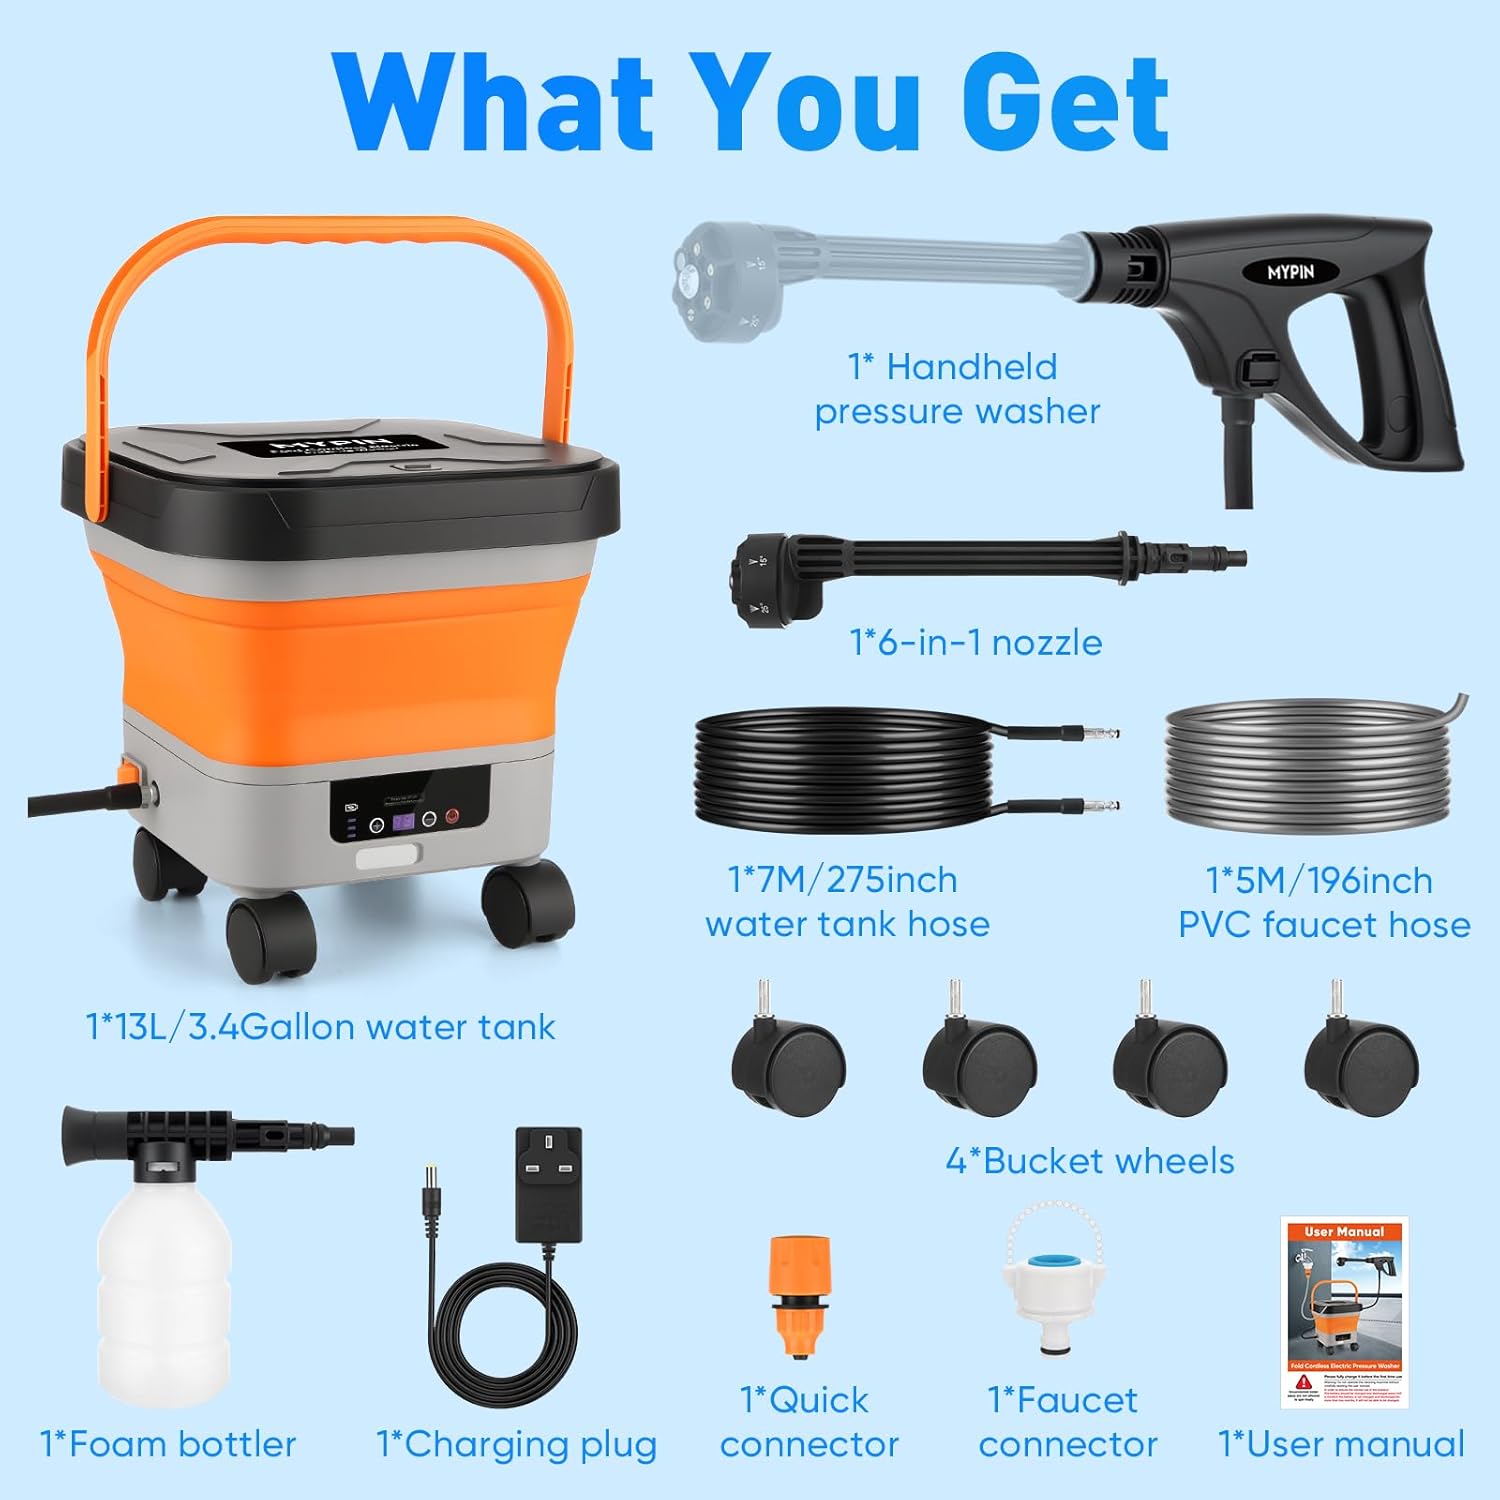
Figura 1.1: All components included in the MYPIN Cordless Electric Pressure Washer package.
2. Informações de segurança
Always observe basic safety precautions when using this product to reduce the risk of injury, electric shock, or fire. Failure to follow these instructions may result in serious injury or property damage.
Diretrizes gerais de segurança
- Leia todas as instruções: Familiarize-se com os controles e o uso correto da lavadora de alta pressão.
- Use equipamento de segurança adequado: Always wear eye protection, gloves, and appropriate footwear.
- Mantenha crianças e animais de estimação afastados: Não permita que crianças ou pessoas sem treinamento operem a lavadora de alta pressão.
- Avoid direct spray: Never direct the water spray at people, pets, or electrical devices.
- Use em áreas bem ventiladas: Assegure ventilação adequada durante o funcionamento.
- Verifique se há danos: Before each use, inspect the pressure washer, hoses, and connections for any signs of damage. Do not use if damaged.
- Armazenamento adequado: Store the pressure washer in a dry, secure location, out of reach of children.
3. Recursos do Produto
The MYPIN Cordless Electric Pressure Washer is designed for versatile cleaning tasks with convenience and efficiency.
Principais características
- Design sem fio e portátil: Features a foldable tank and lightweight washer for easy transport and storage, ideal for home and outdoor cleaning. The foldable water tank measures 9.5 x 9.5 x 7.9 inches when collapsed.
- Adjustable Pressure Levels: Offers 7 adjustable pressure levels with a maximum pressure of 660 PSI, allowing you to customize the water pressure for different cleaning needs and surfaces.
- Bocal 6 em 1: Equipped with a versatile 6-in-1 nozzle for various spray patterns, including 0°, 15°, 25°, 40°, Sector, and Shower modes.
- Tela LCD: An integrated LCD screen displays battery status and current pressure level, providing real-time operational information.
- Tanque de água de grande capacidade: Comes with a 3.4-gallon (13L) water tank, reducing the need for frequent refills during cleaning.
- Dual Hose Options: Includes a 7M (275-inch) water tank hose and a 5M (196-inch) PVC faucet hose for flexible water source options.
- Wheeled Tank: The water tank is fitted with 4 removable wheels for easy maneuverability.
- Bateria de longa duração: A full charge (3-4 hours) provides approximately 25-35 minutes of continuous cleaning time.

Figura 3.1: The 6-in-1 nozzle offers multiple spray patterns for diverse cleaning tasks.

Figura 3.2: The foam bottle attachment for deep cleaning with detergent.

Figura 3.3: The foldable design of the water tank for easy storage and portability.

Figura 3.4: The LCD display provides real-time information on battery and pressure levels.
4. Configuração
Siga estes passos para montar e preparar sua lavadora de alta pressão para o primeiro uso.
- Insert Wheels: Attach the four bucket wheels into the designated slots on the base of the water tank. Ensure they are securely locked in place.
- Install Tank Hose: Connect one end of the 7M water tank hose to the outlet port on the water tank.
- Connect to Washer Gun: Connect the other end of the 7M water tank hose to the inlet port on the handheld pressure washer gun.
- Install 6-in-1 Nozzle: Attach the 6-in-1 nozzle to the front of the washer gun. Twist until it clicks into place.
- Connect to Faucet (Optional): If using a direct water source, connect the 5M PVC faucet hose to a standard faucet using the quick connector and faucet connector. Then, connect the other end of the PVC faucet hose to the water tank's inlet.
- Encha o tanque de água: Open the water tank and fill it with clean water. Ensure the tank is unfolded and stable.
- Carga da bateria: Before first use, fully charge the pressure washer battery using the provided charging plug. The LCD display will indicate charging status.

Figura 4.1: Step-by-step assembly and setup instructions.
5. Operação
Once assembled and charged, your MYPIN pressure washer is ready for use.
Operando a lavadora de pressão
- Ligar: Press the power button on the pressure washer gun to turn it on. The LCD display will illuminate.
- Selecione o nível de pressão: Use the pressure adjustment buttons (+/-) on the washer gun to select one of the 7 available pressure levels. The selected level will be shown on the LCD.
- Escolha o padrão de pulverização: Rotate the 6-in-1 nozzle to select the desired spray pattern (e.g., 0° for concentrated cleaning, 40° for wider coverage, Shower for gentle rinsing).
- Comece a limpeza: Point the nozzle at the surface to be cleaned and press the trigger on the washer gun. Maintain a safe distance from the surface to avoid damage.
- Using the Foam Bottle: To apply detergent, fill the foam bottle with appropriate cleaning solution. Attach the foam bottle to the washer gun where the nozzle usually connects. Press the trigger to spray foam. After applying foam, remove the bottle and reattach the 6-in-1 nozzle for rinsing.
- Desligar: Release the trigger and press the power button to turn off the pressure washer.

Figura 5.1: Effective cleaning of a car using the pressure washer and wheeled tank.
6. Manutenção
A manutenção regular garante a longevidade e o desempenho ideal da sua lavadora de alta pressão.
Limpeza e Armazenamento
- Enxágue após o uso: After each use, run clean water through the pressure washer for a few minutes to flush out any remaining detergent or debris.
- Bico limpo: Inspect and clean the nozzle for any blockages. Use a small pin or needle to clear any debris from the nozzle opening.
- Drenar Água: Empty any remaining water from the tank and hoses to prevent freezing in cold weather, which can cause damage.
- Limpe: Wipe the exterior of the pressure washer and tank with a damp pano. Não use produtos químicos agressivos.
- Armazene adequadamente: Store the pressure washer, hoses, and accessories in a dry, cool, and protected area, away from direct sunlight and extreme temperatures. The foldable tank can be collapsed for compact storage.
- Cuidados com a bateria: Store the battery in a partially charged state if not used for extended periods. Recharge periodically to maintain battery health.
7. Solução De Problemas
If you encounter issues with your pressure washer, refer to the following common problems and solutions.
| Problema | Possível causa | Solução |
|---|---|---|
| Pressure washer does not turn on. | Battery is not charged. Power button not pressed. | Carregue a bateria completamente. Certifique-se de que o botão liga/desliga esteja pressionado firmemente. |
| Baixa pressão da água. | Water tank empty. Nozzle clogged. Hose kinked. | Refill water tank. Clean the nozzle. Straighten the hose. |
| Vazamentos de água nas conexões. | Connections are loose. O-rings are damaged. | Tighten all connections. Inspect and replace damaged O-rings if necessary. |
| Motor runs but no water sprays. | Air in the system. Water inlet blocked. | Prime the pump by running water through it without the nozzle. Check water inlet filter for blockages. |
Se o problema persistir após tentar essas soluções, entre em contato com o suporte ao cliente para obter mais assistência.
8. Especificações
Detailed technical specifications for the MYPIN Cordless Electric Pressure Washer.
| Especificação | Valor |
|---|---|
| Fabricante | MEU PIN |
| Número do modelo do produto | MJ-CE0419&CE0419W |
| Dimensões do produto | 33.02 x 22.1 x 22.1 cm |
| Peso do produto | 4.55 kg |
| Marca | MEU PIN |
| Fonte de energia | Alimentado por bateria (sem fio) |
| Cor | Laranja |
| Comprimento da mangueira | 7 Meters (Water Tank Hose) |
| Pressão Máxima | 660 PSI |
| Capacidade do tanque de água | 13 litros / 3.4 galões |
9. Garantia e Suporte
MYPIN products are manufactured to high-quality standards. This product comes with a standard manufacturer's warranty against defects in materials and workmanship.
Informações de garantia
Please refer to the warranty card included in your package or visit the official MYPIN webConsulte o site para obter os termos e condições detalhados da garantia. Guarde o comprovante de compra como prova de aquisição para eventuais solicitações de garantia.
Suporte ao cliente
For technical assistance, troubleshooting, or to inquire about replacement parts, please contact MYPIN customer support. Contact details can typically be found on the product packaging or the official MYPIN website.


