Introdução
This manual provides essential instructions for the safe and efficient operation, maintenance, and troubleshooting of your Goldair Digital Grind & Brew Coffee Maker. Please read this manual thoroughly before first use and retain it for future reference.
The Goldair Digital Grind & Brew Coffee Maker is designed to deliver fresh, aromatic coffee by integrating a bean grinder and a programmable brewing system. Its sleek black and silver design complements modern kitchens, and the user-friendly control panel offers multiple brewing options. The appliance features a clear water reservoir, a glass coffee pot, and a keep-warm function. Removable filter basket and carafe ensure easy cleaning.
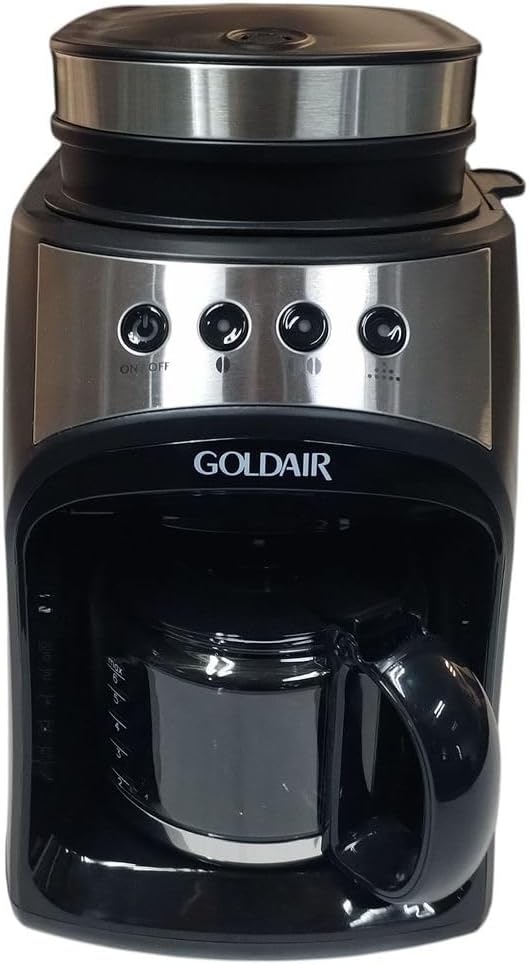
Imagem: Frente view of the Goldair Digital Grind & Brew Coffee Maker, showcasing the control panel, glass carafe, and the Goldair branding.
Instruções importantes de segurança
- Leia todas as instruções antes de operar o aparelho.
- Não toque em superfícies quentes. Use alças ou botões.
- Para se proteger contra incêndio, choque elétrico e ferimentos pessoais, não mergulhe o cabo, os plugues ou o aparelho em água ou outro líquido.
- É necessária supervisão rigorosa quando qualquer aparelho for usado por crianças ou perto delas.
- Desligue da tomada quando não estiver em uso e antes de limpar. Deixe esfriar antes de colocar ou retirar peças e antes de limpar o aparelho.
- Não opere nenhum aparelho com o cabo ou plugue danificado ou após o aparelho apresentar mau funcionamento ou ter sido danificado de qualquer forma.
- O uso de acessórios não recomendados pelo fabricante do aparelho pode resultar em incêndio, choque elétrico ou ferimentos às pessoas.
- Não utilize ao ar livre.
- Não deixe o cabo pendurado na borda da mesa ou do balcão, nem toque em superfícies quentes.
- Não coloque sobre ou perto de um queimador a gás ou elétrico quente, nem em um forno aquecido.
- Sempre conecte primeiro o plugue ao aparelho e, em seguida, ligue o cabo na tomada. Para desconectar, gire qualquer controle para a posição "desligado" e, em seguida, retire o plugue da tomada.
- Não utilize o aparelho para outro fim que não o pretendido.
- Podem ocorrer escaldamentos se a tampa for removida durante o ciclo de preparo.
- Este aparelho é somente para uso doméstico.
Conteúdo da embalagem
Carefully unpack your coffee maker and check that all items are present and in good condition. If any items are missing or damaged, please contact customer support.
- Goldair Digital Grind & Brew Coffee Maker Unit
- Jarra de vidro com tampa
- Cesta de filtro removível
- Colher de medida
- Escova de limpeza
- Manual de Instruções (este documento)

Image: The glass carafe, showing the included measuring scoop and cleaning brush.
Produto acimaview e Componentes
Familiarize yourself with the various parts of your Goldair coffee maker before use.
- Bean Hopper Lid: Cobre o reservatório de grãos.
- Funil de feijão: Holds whole coffee beans for grinding.
- Grinder Assembly: Integrated burr grinder for fresh coffee.
- Reserva de agua: Clear tank for water, with level indicator.
- Painel de controle: Features On/Off, Grind, Brew Strength, and Program buttons.
- Cesta de filtro: Removable basket for ground coffee.
- Chuveiro: Distributes hot water over coffee grounds.
- Jarra de vidro: Recolhe o café coado.
- Placa de aquecimento: Mantém o café preparado aquecido.

Imagem: Angulada view of the coffee maker, highlighting its overall structure including the bean hopper, control panel, and carafe area.

Imagem: Vista de cima para baixo view of the coffee maker with the lid open, showing the water filling area and the removable filter basket compartment.
Configurar
- Descompacte: Remove all packaging materials and labels from the coffee maker.
- Limpeza Inicial: Before first use, wash the glass carafe, carafe lid, and removable filter basket in warm, soapy water. Rinse thoroughly and dry. Wipe the exterior of the coffee maker with a damp pano.
- Posicionamento: Coloque a cafeteira sobre uma superfície plana, estável e resistente ao calor, longe da borda da bancada. Certifique-se de que haja ventilação adequada ao redor do aparelho.
- Primeiro ciclo de preparo (sem café):
- Fill the water reservoir with fresh, cold water up to the MAX fill line.
- Place the empty filter basket into its compartment.
- Coloque a garrafa térmica com a tampa na placa aquecedora.
- Ligue a cafeteira a uma tomada elétrica com aterramento.
- Pressione o botão LIGAR/DESLIGAR para iniciar um ciclo de preparo sem café. Isso limpa os componentes internos.
- Assim que o ciclo estiver completo, descarte a água da jarra.
Instruções de operação
Brewing Coffee from Whole Beans (Grind & Brew)
- Encha o reservatório de água: Open the top lid and fill the water reservoir with fresh, cold water to the desired level, corresponding to the number of cups you wish to brew. Do not exceed the MAX fill line.
- Adicione grãos de café: Open the bean hopper lid and add whole coffee beans. Refer to the recommended ratios in the table below. Do not overfill.
- Inserir cesto de filtro: Ensure the removable filter basket is clean and properly seated in its compartment.
- Coloque a garrafa térmica: Place the glass carafe with its lid securely on the warming plate.
- Select Grind/Brew Settings:
- Pressione o MOAGEM button to select the desired grind setting (e.g., fine, medium, coarse).
- Pressione o FORÇA DE QUEBRA button to choose your preferred coffee strength (e.g., mild, regular, strong).
- (Optional) Use the PROGRAMA button to set a delayed start time for brewing. Consult the specific programming section for detailed instructions.
- Comece a preparar: Pressione o LIGADO/DESLIGADO button. The machine will begin grinding the beans, then automatically proceed to the brewing cycle.
- Mantenha-se aquecido: After brewing is complete, the warming plate will automatically activate to keep the coffee warm for a set period (typically 30-60 minutes) before automatically shutting off.
Brewing Coffee from Pre-Ground Coffee
- Follow steps 1, 3, and 4 from the "Brewing Coffee from Whole Beans" section.
- Adicione café moído: Add the desired amount of pre-ground coffee directly into the filter basket. Do not use the bean hopper for pre-ground coffee.
- Bypass Grinder: Ensure the grinder function is set to "OFF" or bypassed, if applicable, to prevent damage.
- Selecione a intensidade do café: Pressione o FORÇA DE QUEBRA button to choose your preferred coffee strength.
- Comece a preparar: Pressione o LIGADO/DESLIGADO botão.
Recommended Coffee Ratios
| Copos de café | Água (ml) | Whole Beans (grams) | Ground Coffee (scoops) |
|---|---|---|---|
| 2 | 300 | 15-20 | 2 |
| 4 | 600 | 30-40 | 4 |
| 6 | 900 | 45-60 | 6 |
Note: Adjust ratios to personal taste. 1 scoop ≈ 5-7 grams.
Limpeza e Manutenção
A limpeza regular garante o desempenho ideal e prolonga a vida útil da sua cafeteira.
Limpeza diária
- Desconecte: Desligue sempre a cafeteira da tomada antes de a limpar.
- Motivos para descarte: Remove the filter basket and discard used coffee grounds.
- Lavar peças removíveis: Wash the glass carafe, carafe lid, and filter basket in warm, soapy water. Rinse thoroughly and dry. These parts may also be top-rack dishwasher safe (check product markings).
- Limpe o exterior: Limpe as superfícies externas da cafeteira com um pano macio e seco.amp pano. Não use produtos de limpeza abrasivos ou esfregões.
- Limpar a placa de aquecimento: Limpe o prato de aquecimento com um anúncioamp pano. Não use materiais abrasivos.
Limpeza de moedor
The integrated grinder should be cleaned regularly to prevent oil buildup and ensure consistent grinding performance.
- Certifique-se de que a energia esteja desligada: Make sure the coffee maker is unplugged.
- Remove Bean Hopper Lid: Open the lid to the bean hopper.
- Remover a rebarba superior: Carefully lift and twist the upper grinding burr to remove it. Refer to the product diagram for assistance.
- Limpar rebarbas: Use the provided cleaning brush to remove any coffee grounds or residue from both the upper and lower grinding burrs.
- Remontar: Reinsert the upper burr, ensuring it clicks securely into place. Close the bean hopper lid.

Image: A hand demonstrating the removal of the upper burr from the integrated coffee grinder for cleaning.
Descalcificação
Mineral deposits (limescale) can build up in your coffee maker over time, affecting performance and taste. Descale your machine every 2-3 months, or more frequently if you have hard water.
- Preparar a solução descalcificante: Mix 1 part white vinegar with 2 parts water, or use a commercial descaling solution designed for coffee makers, following the product's instructions.
- Encha o reservatório: Pour the descaling solution into the water reservoir up to the MAX fill line.
- Executar meio ciclo: Place the empty carafe on the warming plate. Start a brewing cycle. After about half the solution has brewed through, turn off the coffee maker and let it sit for 15-20 minutes to allow the solution to work.
- Ciclo completo: Ligue a cafeteira novamente para completar o ciclo de preparo.
- Ciclos de enxágue: After the descaling cycle is complete, discard the solution. Fill the water reservoir with fresh, cold water and run at least two full brewing cycles with only water to rinse out any remaining descaling solution.
Solução de problemas
Review Antes de entrar em contato com o suporte ao cliente, verifique os seguintes problemas comuns e suas soluções.
| Problema | Possível causa | Solução |
|---|---|---|
| O café não está sendo preparado. | No power; water reservoir empty; carafe not properly placed. | Check power connection; fill water reservoir; ensure carafe is correctly positioned on warming plate. |
| O café está muito fraco. | Not enough coffee grounds; incorrect brew strength setting; coarse grind. | Add more coffee; select a stronger brew setting; adjust grinder to a finer setting. |
| O café é muito forte. | Too much coffee grounds; incorrect brew strength setting; fine grind. | Reduce coffee amount; select a milder brew setting; adjust grinder to a coarser setting. |
| O moedor não está funcionando. | Bean hopper empty; grinder clogged; burr not properly seated. | Fill bean hopper; clean grinder burrs (see "Grinder Cleaning"); ensure burr is correctly installed. |
| Água transbordando do cesto do filtro. | Excesso de pó de café; filtro entupido; jarra removida durante o preparo. | Reduza a quantidade de café; limpe o filtro; não retire a jarra durante o preparo. |
Especificações
| Recurso | Detalhe |
|---|---|
| Número do modelo | B0FN3W3P6P |
| Marca | Goldair (Generic) |
| Potência / Wattage | 900 watts |
| Capacidade | 1 litros (aproximadamente 4 a 6 xícaras) |
| Cor | Black And Silver |
| Material | Metal, Plástico |
| Dimensões do produto (P x L x A) | 25P x 20L x 35A centímetros |
| Peso do item | 3 kg |
| Características especiais | Automatic Shut-off, Built-in Grinder, Programmable |
| Tipo de Cafeteira | Máquina de café gota a gota |
Garantia e Suporte
For warranty information or technical support, please refer to the warranty card included with your product or contact the retailer where the product was purchased. Please have your model number (B0FN3W3P6P) and purchase date available when contacting support.
For general inquiries, you may also visit the manufacturer's website or contact their customer service department. Contact details are typically found on the product packaging or the retailer's website.


