1. Produto acabadoview
The Radiolink T12D is a 12-channel 2.4GHz RC transmitter designed for a wide range of remote-controlled models. It comes paired with the R12F receiver, offering reliable control and advanced features for enthusiasts and professionals. This system provides stable signal transmission, extensive model storage, and compatibility with various external modules and simulators.
Principais características
- 12 Fully Proportional Channels: All 12 channels are programmable for advanced settings, including V-tail and Delta-Wing mixing. (Note: T12D firmware must be updated to version 1.7.1 for full functionality).
- 32 Model Storage Capacity: Store settings for up to 32 different models.
- Extended Range and Stability: Features 2.4GHz FHSS spread spectrum technology with 67 channels, ensuring excellent anti-interference performance and a stable signal up to 4 km.
- External Module Support: Compatible with popular long-range RC modules like ExpressLRS (e.g., BETAFPV ELRS Nano TX, Radiolink ATA ELSR 1W) and TBS Crossfire (e.g., TBS Crossfire Nano TX) via a pre-installed module bay.
- Open-Source Simulator Compatibility: Connect directly to your computer via a Type-C cable for use with simulators such as TRYP FPV, AeroFly, Uncrashed, Liftoff, FPV LOGIC, and Velocidrone (TBS Simulator). Compatible with MacOS and Windows.
- Multi-Language Navigation: The 2.8-inch color screen offers a user-friendly menu in multiple languages, including English, German, French, Russian, Chinese, Japanese, Spanish, Korean, Thai, and Polish.
- Wide Receiver Compatibility: Compatible with Radiolink R16F, R12F, R8EF, R8XM, R8FM, R8SM, R8FGH, R8FG, R7FG, R6FG, R6F, R4FGM, and R4F receivers. Note: Not compatible with non-Radiolink receivers/transmitters.
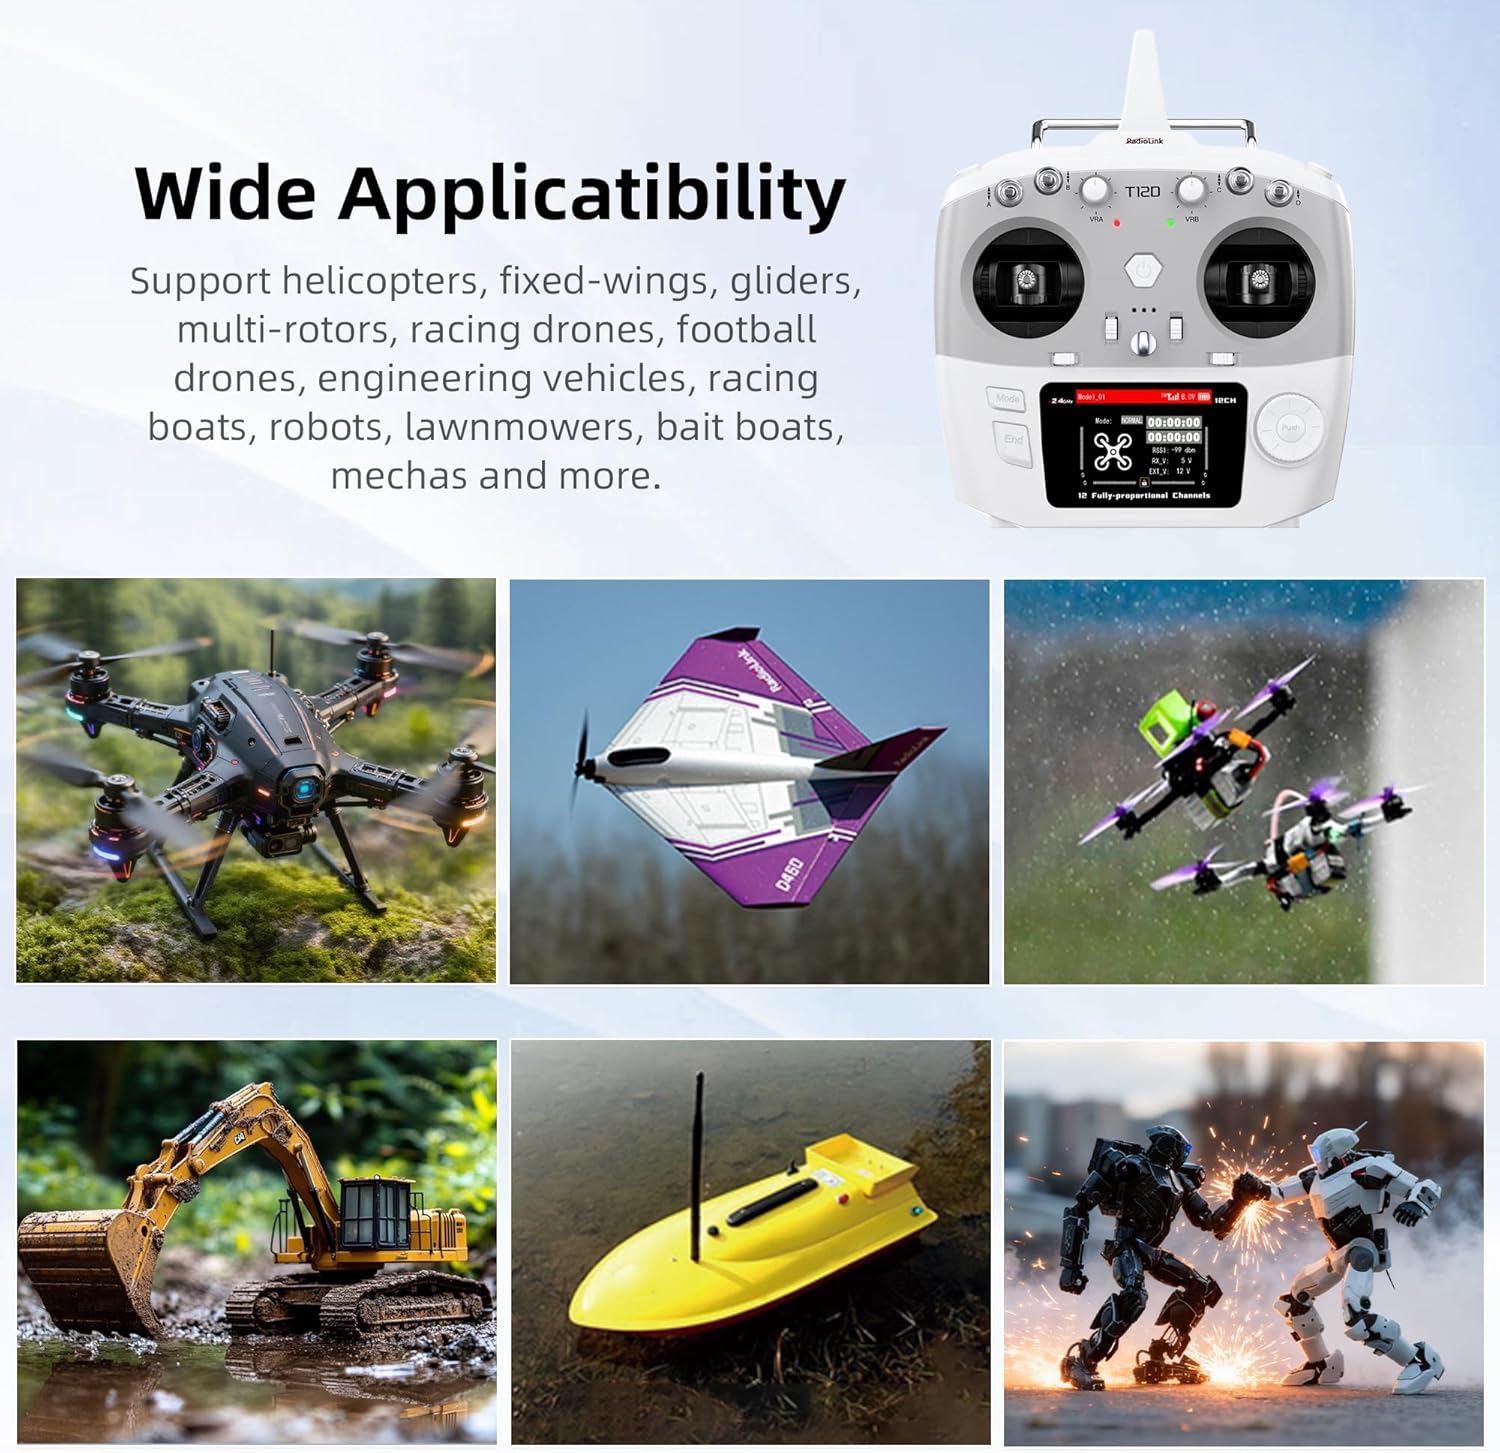
Image: Radiolink T12D Transmitter highlighting its 12 channels and other features.

Image: Wide Applicability of the T12D transmitter across different RC models.
2. Configuração
2.1 Conteúdo da embalagem
Before proceeding with setup, ensure all components are present in the package:
- 1 x T12D Transmitter
- 1 x R12F Receiver
- 1 x Cabo Tipo C
- 1 x Hook and Spring
- 1 x Manual de Instruções
- 1 x ELSR Module Mounting Base (pre-installed)

Image: Package List showing all included items.
2.2 Instalação da bateria
The T12D transmitter supports various battery types. Open the battery compartment on the back of the transmitter. Insert the chosen battery type, ensuring correct polarity. The transmitter supports LiPo batteries (2S-4S / 18650 LiPo Battery) or 8x AA batteries. A Type-C port is available for temporary 5V power, and a JST 2Pin connector is provided for battery connection.
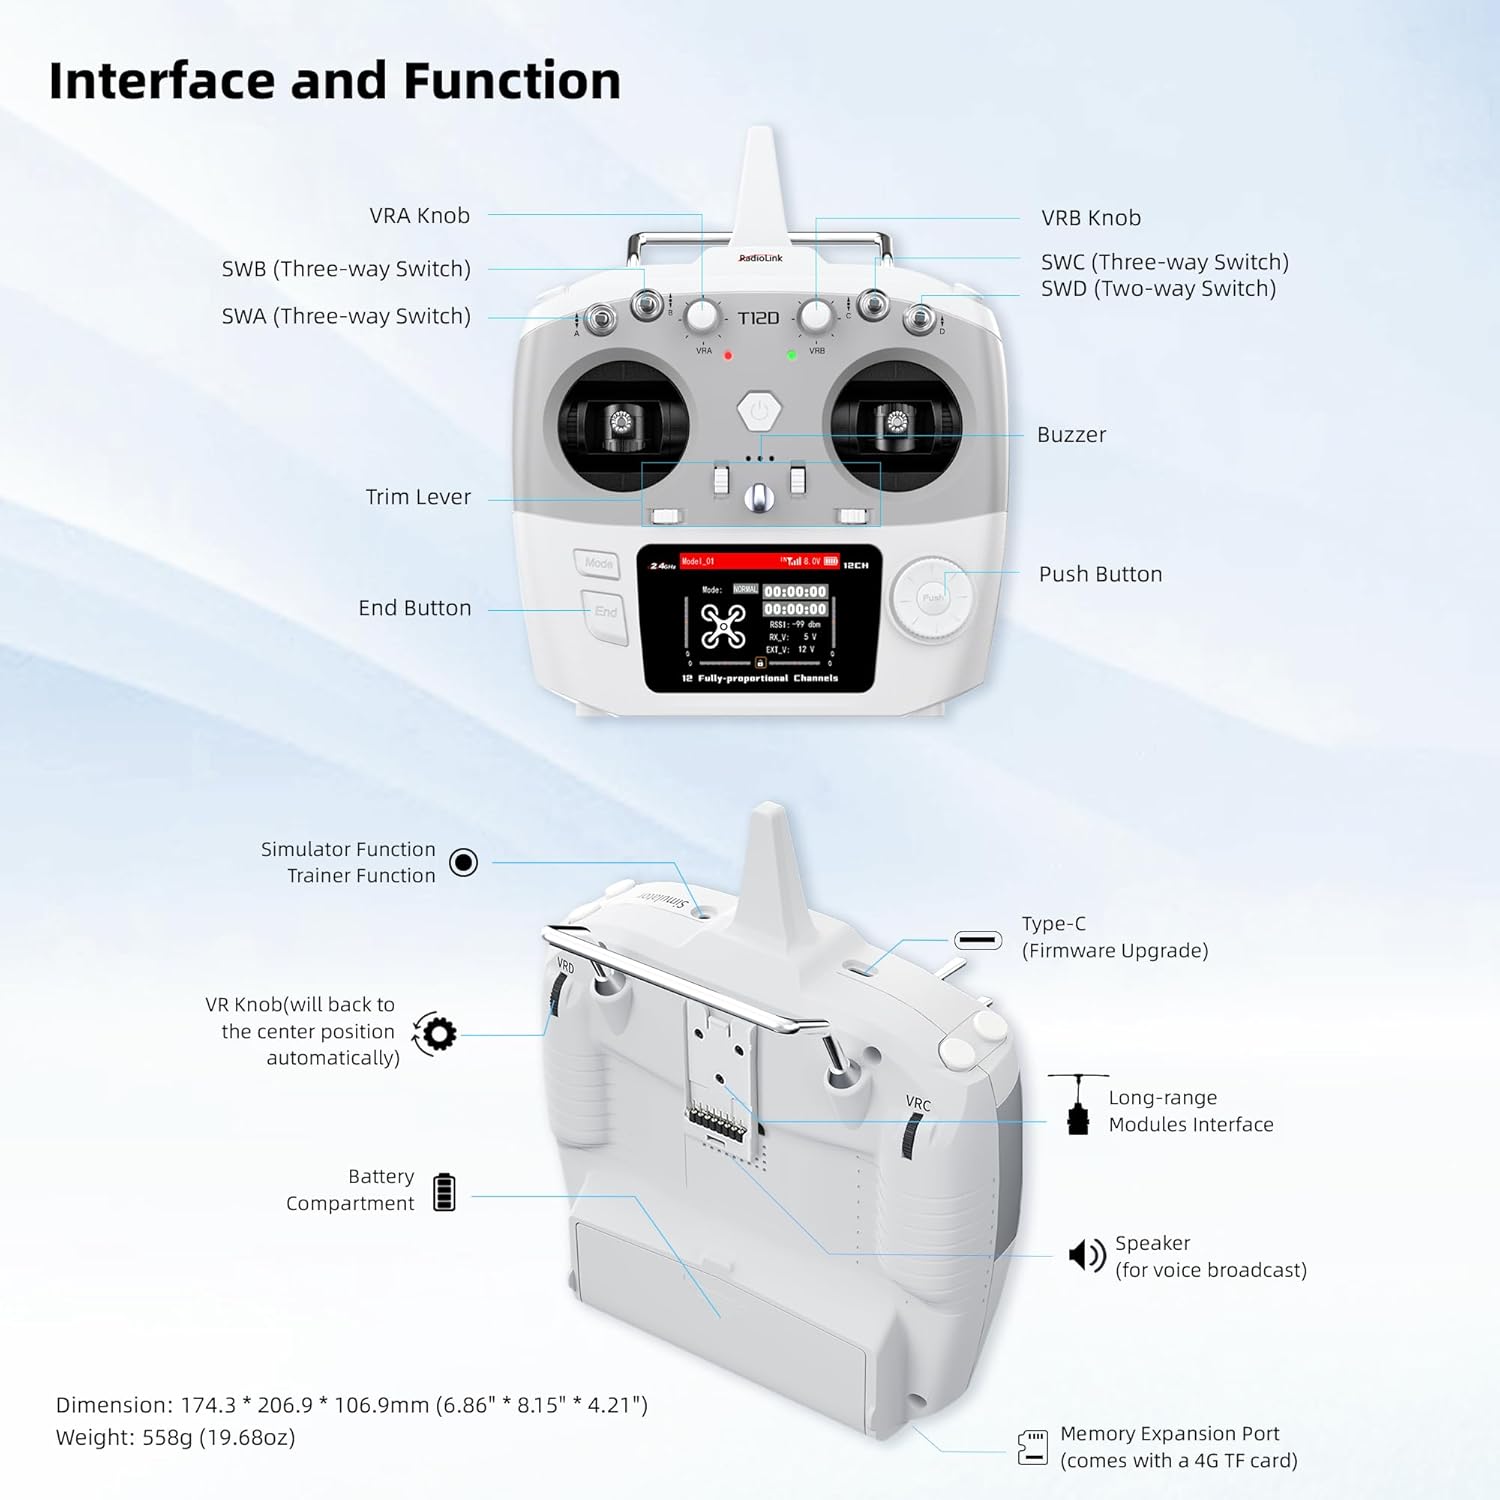
Image: Supported Battery Types and Battery Compartment details.
2.3 Vinculação do receptor
To establish communication between the T12D transmitter and the R12F receiver, a binding process is required. Refer to the detailed binding instructions in the included manual for your specific receiver model. Ensure the transmitter and receiver are powered on and within close proximity during the binding procedure.
2.4 Atualização de firmware
For optimal performance and access to the latest features, it is recommended to keep the T12D firmware updated. Connect the transmitter to your computer using the provided Type-C cable. Visit the official Radiolink website for the latest firmware and update instructions. Firmware version 1.7.1 or higher is required for full 12-channel functionality and advanced mixing options.

Image: Firmware Update and RC Simulator Support.
3. Instruções de operação
3.1 Transmitter Interface and Controls
Familiarize yourself with the various controls and indicators on the T12D transmitter:

Image: Transmitter Interface and Function Diagram.
- VRA/VRB Knobs: Proportional rotary knobs.
- SWB/SWA (Three-way Switch): Configurable 3-position switches.
- SWC/SWD (Two-way Switch): Configurable 2-position switches.
- Alavancas de ajuste: For fine-tuning control surfaces.
- End Button: Utilizado para navegação e seleção em menus.
- Botão de apertar: Utilizado para navegação e seleção em menus.
- Campainha: Fornece feedback sonoro.
- Porta Type-C: For firmware upgrades and simulator connection.
- Long-range Modules Interface: Bay for external modules.
- Palestrante: For voice broadcast.
- Memory Expansion Port: Supports 4G TF card.
3.2 Navegação e configurações do menu
The T12D features a 2.8-inch color display with an intuitive menu system. Use the navigation buttons and knobs to access and adjust settings for your models.

Image: Menu Multiple Languages display.
- Menu principal: Access General Settings, Advanced Settings, Transmitter Settings, and Receiver Settings.
- Seleção de idioma: Navigate to System Settings to choose your preferred language.
- Model Storage: The transmitter can store up to 32 models. Select and configure model-specific settings as needed.
- Mixagens programáveis: Configure various mixing functions such as V-tail, Delta-Wing, and other custom mixes. Ensure firmware is updated to version 1.7.1 for advanced mixing capabilities.
3.3 External Module Usage
The T12D supports external long-range modules. Insert the compatible module into the pre-installed module bay. Configure the module settings through the transmitter's menu as required by the specific module.

Image: Mainstream External Modules Support.
3.4 Simulator Function
Connect the T12D to your computer using the Type-C cable to use it as a controller for RC simulators. No additional dongle is required. This feature is compatible with popular simulators like TRYP FPV, AeroFly, Uncrashed, Liftoff, FPV LOGIC, and Velocidrone (TBS Simulator) on MacOS and Windows.
3.5 Bait Boat Application
The T12D offers specialized functions for bait boat control, including 50cm fishing spot accuracy, user-defined 100 fishing spots, 600m stable offshore control distance, real-time built-in telemetry, and fishing spot GPS coordinate saving. Ensure the receiver is changed to R16F when using the fishing spot function.

Image: Application to Bait Boat.
4. Manutenção
- Limpeza: Use um pano macio e seco para limpar o transmissor e o receptor. Evite usar solventes ou produtos de limpeza abrasivos.
- Armazenar: Store the transmitter and receiver in a cool, dry place away from direct sunlight and extreme temperatures. Remove batteries if storing for extended periods to prevent leakage.
- Cuidados com a bateria: Follow the manufacturer's guidelines for charging and discharging LiPo batteries. Do not overcharge or over-discharge.
- Firmware: Regularly check the Radiolink webSite para atualizações de firmware para garantir desempenho ideal e acesso a novos recursos.
5. Solução De Problemas
- Sem energia:
- Verifique a instalação da bateria e certifique-se de que ela esteja carregada.
- Verifique a polaridade da bateria.
- Try connecting via Type-C for temporary power to diagnose.
- No Signal/Binding Issues:
- Certifique-se de que tanto o transmissor quanto o receptor estejam ligados.
- Repeat the binding procedure as described in the manual.
- Check for physical obstructions or excessive distance between transmitter and receiver during binding.
- Confirm receiver compatibility with the T12D.
- Controles não respondem:
- Check receiver connections to your model's servos/ESCs.
- Verify model settings in the transmitter menu.
- Ensure the transmitter's battery is not low.
- Simulator Not Working:
- Ensure the Type-C cable is securely connected to both the transmitter and computer.
- Verify that the simulator software recognizes the T12D as a joystick/controller.
- Check computer's device manager for proper driver installation (usually plug-and-play).
6. Especificações
| Nome do modelo | Radiolink T12D |
| Canais | 12 canais |
| Freqüência | 2.4 GHz FHSS |
| Distância de controle | Até 4 km (2.49 milhas) |
| Model Storage | 32 Modelos |
| Mostrar | 2.8-inch Color Screen (320*240 pixels) |
| Material principal | Plástico |
| Cor | Branco |
| Dimensões (C x L x A) | 20.7 x 17.4 x 10.7 cm (8.15 x 6.85 x 4.21 polegadas) |
| Peso | 540 gramas (1.19 libras) |
| Requisitos de bateria | Sim (pilhas não incluídas) |
| Modo de operação | Controle remoto |
| Características especiais | 12-channel RC transmitter with 32 storage modes, anti-interference, stable signal up to 4 km, compatible with external modules (ExpressLRS, TBS Crossfire), open-source simulator support, multi-language menu. |
7. Garantia e Suporte
7.1 Garantia do Produto
Information regarding product warranty is typically provided with the purchase documentation or on the manufacturer's official website. Please refer to these resources for details on warranty coverage and terms.
7.2 Suporte ao cliente
For technical assistance, troubleshooting, or any product-related inquiries, please contact the Radiolink after-sales team. You can typically find contact information on the official Radiolink website or through the retailer where the product was purchased. Online support is also available via Amazon by contacting Radiolink Direct.
Radiolink is committed to providing high-quality, diversified, and competitive technological products, backed by a professional research and development team and automated testing processes.


