1. Introdução e maisview
This manual provides essential information for the safe and efficient operation of your Mayer 35L Electric Oven, model MMO3501. Please read these instructions thoroughly before first use and retain for future reference. This appliance is designed for household use only.
The Mayer 35L Electric Oven MMO3501 is a versatile kitchen appliance featuring a 35-liter capacity, ideal for baking, grilling, and roasting. It includes convection and rotisserie functions, adjustable temperature control from 100°C to 230°C, and dual heating elements with independent upper and lower temperature control. A 60-minute timer, dual tempered glass door, non-stick cavity, interior cooking light, and three rack positions enhance its functionality. A removable crumb tray simplifies cleaning.
2. Instruções importantes de segurança
Ao usar aparelhos elétricos, precauções básicas de segurança devem sempre ser seguidas para reduzir o risco de incêndio, choque elétrico e ferimentos às pessoas, incluindo o seguinte:
- Leia todas as instruções antes de usar o forno.
- Não toque em superfícies quentes. Use sempre luvas ou protetores de forno ao manusear materiais quentes.
- É necessária supervisão rigorosa quando qualquer aparelho for usado por crianças ou perto delas.
- To protect against electric shock, do not immerse the cord, plug, or any part of the oven in water or other liquid.
- Desligue da tomada quando não estiver em uso e antes de limpar. Deixe esfriar completamente antes de colocar ou retirar peças e antes de limpar o aparelho.
- Não opere nenhum eletrodoméstico com um cabo ou plugue danificado, ou após o mau funcionamento do eletrodoméstico ou danificado de qualquer maneira. Entre em contato com o suporte ao cliente para obter assistência.
- O uso de acessórios não recomendados pelo fabricante do aparelho pode causar riscos ou ferimentos.
- Não utilize ao ar livre.
- Não deixe o cabo pendurado na borda de uma mesa ou balcão, nem toque em superfícies quentes.
- Não coloque o forno sobre ou perto de um queimador a gás ou elétrico quente, nem dentro de um forno aquecido.
- Deve-se ter extremo cuidado ao mover um aparelho que contenha óleo quente ou outros líquidos quentes.
- Não cubra a bandeja de migalhas ou qualquer parte do forno com papel-alumínio. Isso causará superaquecimento do forno.
- Não guarde nenhum material, além dos acessórios recomendados pelo fabricante, neste forno quando não estiver em uso.
- Não coloque alimentos muito grandes ou utensílios de metal no forno, pois podem causar incêndio ou risco de choque elétrico.
- Pode ocorrer um incêndio se o forno estiver coberto ou em contato com material inflamável, incluindo cortinas, persianas, paredes e similares, enquanto estiver em funcionamento.
- Always ensure proper ventilation around the oven during use.
3. Componentes e acessórios do produto
Familiarize yourself with the various parts of your Mayer 35L Electric Oven:

Figura 3.1: Frente view of the oven, showcasing the main door, control knobs on the right, and an interior cooking light illuminating a roasted chicken.

Figura 3.2: Angulado view of the oven, highlighting the control panel with temperature, function, and timer knobs, and the interior with a baking rack and baking tray.
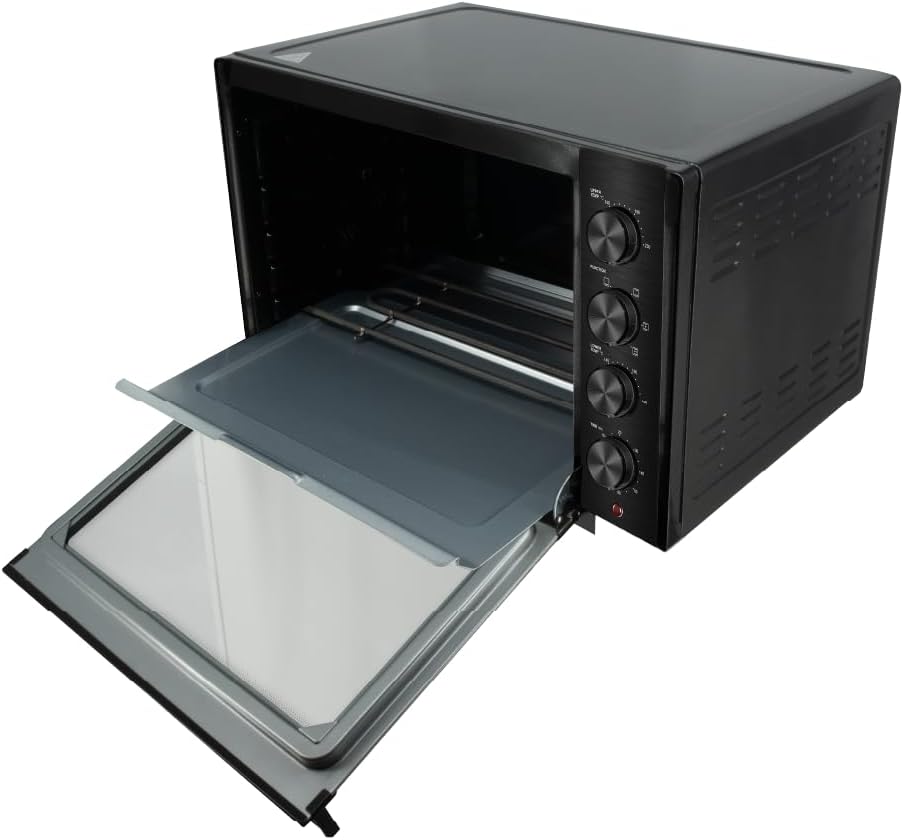
Figura 3.3: The oven with its door open, providing a clear view of the non-stick interior cavity, upper and lower heating elements, and the removable crumb tray at the bottom.
Acessórios incluídos:
- Grelha para assar: For supporting food items during baking or grilling.
- Assadeira: For collecting drips or baking various foods.
- Alça da bandeja: For safely inserting and removing hot baking trays and racks.
- Kit de espeto rotativo: Inclui espeto giratório, garfos e cabo para assar no espeto.
4. Configuração e primeiro uso
Desembalagem:
- Retire cuidadosamente o forno e todos os acessórios da embalagem.
- Remove any packing materials, stickers, or labels from the oven and its accessories.
- Inspecione o forno para verificar se há danos. Não o utilize se estiver danificado.
Colocação:
- Coloque o forno sobre uma superfície estável, nivelada e resistente ao calor.
- Ensure there is adequate space (at least 10-15 cm) on all sides and above the oven for proper ventilation. Do not place it directly against a wall or under cabinets.
- Keep the oven away from flammable materials such as curtains, drapes, and paper.
- Conecte o cabo de alimentação a uma tomada elétrica aterrada.
Antes do primeiro uso:
- Wash the baking rack, baking tray, and rotisserie kit in warm, soapy water. Rinse and dry thoroughly.
- Limpe o interior e exterior do forno com adamp pano.
- To eliminate any manufacturing oils or odors, operate the oven empty for approximately 15 minutes at 230°C on the 'Bake' function. A slight odor or smoke may be present; this is normal and will dissipate. Ensure the room is well-ventilated during this process.
5. Instruções de operação
Painel de controle encerradoview:
- Upper Temperature Control Knob: Adjusts the temperature for the upper heating elements (100°C - 230°C).
- Botão de função: Selects the cooking mode (e.g., Bake, Grill, Convection, Rotisserie).
- Lower Temperature Control Knob: Adjusts the temperature for the lower heating elements (100°C - 230°C).
- Botão do cronômetro: Sets the cooking duration (up to 60 minutes) or to 'Stay On'.
Operação geral:
- Preparar comida: Place food on the baking tray or rack. For rotisserie, secure food onto the rotisserie spit.
- Acessórios de inserção: Slide the baking rack or tray into one of the three rack positions. For rotisserie, insert the rotisserie spit into the designated slots.
- Temperatura definida: Turn the Upper and/or Lower Temperature Control Knobs to the desired temperature (100°C - 230°C). For most baking, both upper and lower elements are used.
- Selecione a função: Turn the Function Knob to select the desired cooking mode. Options typically include:
- Assar: Uses both upper and lower heating elements for general baking.
- Grade: Primarily uses the upper heating elements for grilling.
- Convecção: Activates the fan for even heat distribution, ideal for faster and more uniform cooking.
- Churrasqueira: Rotates the spit for even roasting of larger items.
- Definir temporizador: Turn the Timer Knob to the desired cooking time (up to 60 minutes). The oven will automatically turn off when the timer reaches zero. To cook for longer periods, turn the timer to the 'Stay On' position. Remember to manually turn off the oven when using 'Stay On'.
- Pré-aquecimento: For best results, pre-heat the oven for 10-15 minutes before placing food inside. Set the desired temperature and function, then set the timer. Once the pre-heating time is complete, insert your food.
- Interior Cooking Light: The oven is equipped with an interior light to monitor cooking progress without opening the door.
- Conclusão: When cooking is complete, the timer will chime (if set). Carefully remove food using oven mitts and the tray handle. Unplug the oven when not in use.
6. Manutenção e Limpeza
A limpeza e a manutenção regulares garantirão a longevidade e o desempenho ideal do seu forno.
- Desligue sempre o forno da tomada. Desligue da tomada e deixe esfriar completamente antes de limpar.
- Limpeza externa: Limpe as superfícies externas com adamp Pano e detergente neutro. Não utilize produtos de limpeza abrasivos ou esponjas de aço, pois podem danificar o acabamento.
- Limpeza de interiores: The oven features a non-stick cavity. Wipe the interior walls with a damp cloth and mild, non-abrasive cleaning solution. For stubborn stains, a paste of baking soda and water can be applied, left for a few minutes, then wiped clean.
- Bandeja de migalhas removível: Pull out the crumb tray from the bottom of the oven. Discard crumbs and wash the tray in warm, soapy water. Rinse and dry thoroughly before replacing. Clean regularly to prevent grease buildup and potential fire hazards.
- Acessórios: Wash the baking rack, baking tray, and rotisserie kit in warm, soapy water. Rinse and dry thoroughly. These accessories may also be dishwasher safe (check manufacturer's recommendations if available).
- NÃO mergulhe o corpo do forno, o cabo de alimentação ou a ficha em água ou qualquer outro líquido.
7. Solução De Problemas
Se você tiver problemas com seu forno, consulte os problemas comuns e suas soluções a seguir:
| Problema | Possível causa | Solução |
|---|---|---|
| O forno não liga. | Sem fonte de alimentação. Temporizador não definido. | Check if the oven is properly plugged into a working outlet. Ensure the Timer Knob is set to a cooking duration or 'Stay On'. |
| A comida está cozinhando de forma irregular. | Posição incorreta da cremalheira. Superlotação do forno. Porta não totalmente fechada. | Adjust the rack position for optimal heat distribution. Avoid placing too much food in the oven at once. Ensure the oven door is securely closed. Consider using the convection function for more even cooking. |
| Fumaça ou odor incomum durante o funcionamento. | Primeiro uso, realize a queima completa. Resíduos ou derramamentos de alimentos. Excessive grease buildup. | This is normal during initial use; ensure good ventilation. Clean the interior thoroughly after the oven cools down. Regularly clean the crumb tray and interior to prevent buildup. |
| A função de rotisserie não está funcionando. | Rotisserie kit not properly installed. O botão de função não está configurado para Rotisserie. | Ensure the rotisserie spit is correctly seated in the drive socket and support. Turn the Function Knob to the Rotisserie setting. |
Se o problema persistir após verificar esses pontos, entre em contato com o suporte ao cliente.
8. Especificações
| Modelo: | MMO3501 |
| Capacidade bruta: | 35 litros |
| Volumetage: | 220-240V ~, 50-60Hz |
| O quetage: | 1600 Watts |
| Temperatura ajustável: | 100°C - 230°C |
| Temporizador: | Até 60 minutos |
| Dimensões do produto (C*L*A): | 536 mm * 380 mm * 335 mm |
| Peso líquido: | 7.5 quilos |
| Peso bruto: | 10 quilos |
| Safety Mark: | 250995-11 |
| Características especiais: | Convection & Rotisserie Functions, Dual Heating with Independent Upper & Lower Temperature Control |
9. Garantia e Suporte
Informações sobre garantia:
This Mayer 35L Electric Oven MMO3501 comes with a Garantia de 1 ano from the date of purchase. This warranty covers manufacturing defects under normal household use. Please retain your proof of purchase for warranty claims.
Suporte ao cliente:
For technical assistance, warranty claims, or inquiries regarding your Mayer oven, please contact Mayer customer support. Contact details can typically be found on the manufacturer's official website ou sua documentação de compra.
Atenção: Não tente consertar o aparelho por conta própria. Reparos não autorizados anularão a garantia.


