Introdução
Thank you for choosing the Gevi 10-Cup Drip Coffee Maker with Built-in Grinder. This appliance is designed to provide fresh, delicious coffee with convenience and versatility. Please read this manual thoroughly before operating the coffee maker to ensure safe and optimal performance. Keep this manual for future reference.
Instruções importantes de segurança
Ao usar aparelhos elétricos, precauções básicas de segurança devem sempre ser seguidas para reduzir o risco de incêndio, choque elétrico e ferimentos às pessoas, incluindo o seguinte:
- Leia todas as instruções.
- Não toque em superfícies quentes. Use alças ou botões.
- Para se proteger contra incêndio, choque elétrico e ferimentos pessoais, não mergulhe o cabo, os plugues ou o aparelho em água ou outro líquido.
- É necessária supervisão rigorosa quando qualquer aparelho for usado por crianças ou perto delas.
- Desligue da tomada quando não estiver em uso e antes de limpar. Deixe esfriar antes de colocar ou retirar peças e antes de limpar o aparelho.
- Não opere nenhum aparelho com um cabo ou plugue danificado ou após o aparelho apresentar mau funcionamento ou ter sido danificado de qualquer maneira. Devolva o aparelho à assistência técnica autorizada mais próxima para exame, reparo ou ajuste.
- O uso de acessórios não recomendados pelo fabricante do aparelho pode resultar em incêndio, choque elétrico ou ferimentos às pessoas.
- Não utilize ao ar livre.
- Não deixe o cabo pendurado na borda da mesa ou do balcão, nem toque em superfícies quentes.
- Não coloque sobre ou perto de um queimador a gás ou elétrico quente, nem em um forno aquecido.
- Sempre conecte primeiro o plugue ao aparelho e, em seguida, ligue o cabo na tomada. Para desconectar, gire qualquer controle para a posição "desligado" e, em seguida, retire o plugue da tomada.
- Não utilize o aparelho para outro fim que não o pretendido.
- Podem ocorrer escaldamentos se a tampa for removida durante os ciclos de preparo.
Conteúdo da embalagem
Por favor, marque a caixa para os seguintes itens:
- 1 x Drip Coffee Maker
- 1 x Glass Coffee Pot (Carafe)
- 1 x Scoop
- 1 x Permanent Filter
- 1 x Manual (este documento)
Note: The Filter Insert with Drip Stop and Filter Ring are typically pre-assembled within the coffee maker.

Image: Included accessories for the Gevi coffee maker, showing the permanent filter, filter insert with drip stop, glass coffee pot, scoop, and filter ring.
Produto acimaview
Familiarize yourself with the components of your Gevi coffee maker.

Imagem: Frente view of the Gevi 10-Cup Drip Coffee Maker, showing the control panel, bean hopper, and glass carafe.
Componentes principais:
- Funil de feijão: Para grãos de café inteiros.
- Moedor: Integrated burr grinder for fresh grinding.
- Tanque de água: 1.5L capacity for water.
- Painel de controle: Digital display, program buttons, grind off, strength control, hour, min, on/off.
- Cesta de filtro: Holds the permanent filter or paper filter.
- Jarra de vidro: Capacidade para 10 xícaras de café coado.
- Placa de aquecimento: Mantém o café aquecido após o preparo.
Configuração e primeiro uso
1. Desembalagem e limpeza inicial:
- Remove all packaging materials and labels from the coffee maker.
- Wash the glass carafe, permanent filter, and scoop in warm, soapy water. Rinse thoroughly and dry.
- Limpe o exterior da cafeteira com adamp pano.
- Before first use, run two full cycles with only water to clean the internal components. Fill the water tank to the MAX level, place the empty carafe on the warming plate, and press the ON/OFF button to start. Discard the water after each cycle.
2. Colocação:
Place the coffee maker on a flat, stable, heat-resistant surface, away from the edge of the counter. Ensure there is adequate clearance above the unit for opening the lid and accessing the bean hopper and water tank.

Image: Gevi coffee maker on a kitchen counter, illustrating its dimensions (12.36"D x 8.38"W x 16.93"H).
Instruções de operação
1. Adding Water:
Open the water tank lid and fill the water tank with fresh, cold water up to the desired cup marking (2-10 cups). Do not exceed the MAX fill line.

Image: Hand pouring water into the coffee maker's water reservoir.
2. Adding Coffee Beans (Grind & Brew):
- Open the bean hopper lid and add whole coffee beans. Do not overfill.
- Select your desired grind fineness using the grind setting knob. There are 8 grind settings available.
- Ensure the permanent filter is correctly placed in the filter basket.
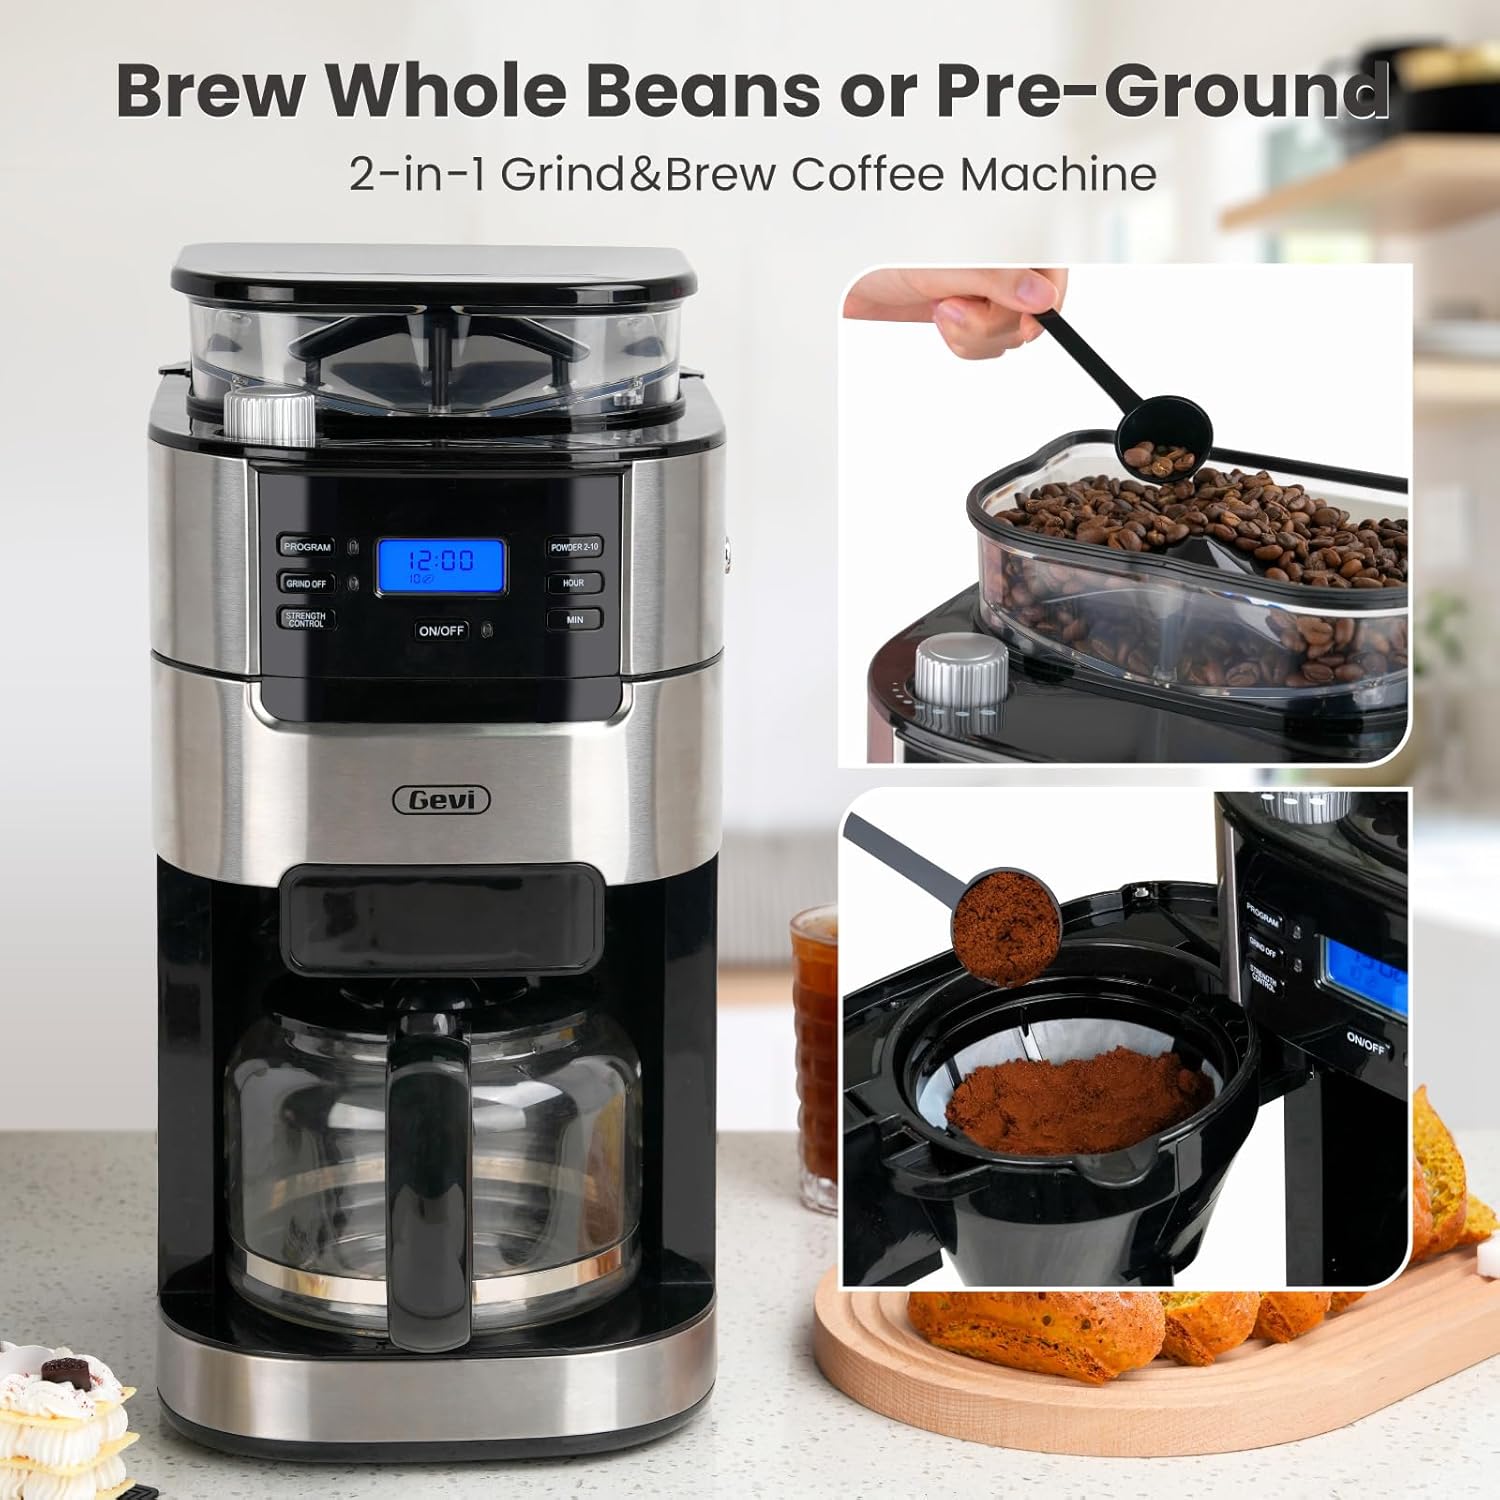
Image: Gevi coffee maker showing coffee beans being added to the grinder and ground coffee in the filter basket.

Image: Hand adjusting the grind fineness knob on the Gevi coffee maker, indicating 8 grind settings.
3. Adding Pre-Ground Coffee:
- Press the "GRIND OFF" button to disable the grinder.
- Add the desired amount of pre-ground coffee directly into the permanent filter. Use the provided scoop for accurate measurement.
4. Selecting Coffee Strength:
Press the "STRENGTH CONTROL" button to cycle through the available strength options: Mild, Medium, and Strong. The selected strength will be indicated on the display.

Image: Control panel of the Gevi coffee maker showing the "STRENGTH CONTROL" button and indicators for Mild, Medium, and Strong coffee.
5. Setting the Timer (Programmable Brew):
The coffee maker features a 24-hour programmable timer for delayed brewing.
- Press the "PROGRAM" button. The display will flash.
- Use the "HOUR" and "MIN" buttons to set the desired brew time.
- Press "PROGRAM" again to confirm the setting. The program indicator light will illuminate.

Image: Close-up of the Gevi coffee maker's control panel, highlighting the digital display and timer setting buttons.
6. Starting the Brew Cycle:
Place the glass carafe with its lid on the warming plate. Press the "ON/OFF" button to start brewing. The indicator light will illuminate, and the brewing process will begin.

Image: A sequence of images showing adding water, adding coffee (powder or beans), personalizing settings, and one-touch brewing with the Gevi coffee maker.
7. Função Manter Aquecido:
After brewing, the warming plate will automatically activate to keep the coffee warm for 15 to 120 minutes. The duration can be adjusted (refer to the full manual for specific adjustment steps if not on control panel).

Image: Coffee being poured from the carafe, with the warming plate glowing, indicating the keep warm function is active for 15-120 minutes.
Manutenção e Limpeza
A limpeza regular garante o desempenho ideal e prolonga a vida útil da sua cafeteira.
1. Limpeza diária:
- Sempre desligue a cafeteira antes de limpá-la.
- Wash the glass carafe, permanent filter, and scoop in warm, soapy water after each use. These parts are also dishwasher safe (top rack only).
- Limpe o exterior da cafeteira com um pano macio e úmidoamp pano. Não use produtos de limpeza abrasivos ou esfregões.
- Empty and clean the bean hopper regularly to prevent oil buildup.
2. Cleaning the Grinder:
The integrated burr grinder should be cleaned periodically to prevent clogging and ensure consistent grinding. Refer to the full manual for detailed instructions on disassembling and cleaning the burr components.
3. Descalcificação:
Mineral deposits (limescale) can build up in your coffee maker over time, affecting performance. Descale your coffee maker every 2-3 months, or more frequently if you have hard water.
- Encha o reservatório de água com uma mistura de vinagre branco e água (na proporção de 1:2).
- Coloque a jarra vazia na placa de aquecimento.
- Execute um ciclo de preparo completo.
- Após o ciclo, deixe a solução repousar na jarra por 15 a 20 minutos.
- Descarte a solução e enxágue bem a garrafa.
- Faça 2 a 3 ciclos com água fresca e limpa para remover qualquer sabor residual de vinagre.
Solução de problemas
| Problema | Possível causa | Solução |
|---|---|---|
| O café não se prepara. | No water in tank; power not connected; program timer set. | Fill water tank; ensure plug is in outlet; check program settings. |
| O gosto do café é fraco. | Not enough coffee; coarse grind setting; strength setting too low. | Add more coffee; adjust grind to finer setting; select a stronger brew strength. |
| O moedor está fazendo barulho ou não está moendo. | Beans jammed; grinder needs cleaning. | Clear any jammed beans; clean the burr grinder components. |
| O café transborda do filtro. | Café em excesso; filtro entupido; garrafa térmica mal posicionada. | Reduce coffee amount; clean filter; ensure carafe is centered on warming plate. |
| Vazamentos de água da unidade. | Water tank overfilled; components not assembled correctly. | Do not exceed MAX fill line; ensure all parts are securely in place. |
Especificações
| Marca | Gevi |
| Nome do modelo | Drip Coffee Machine (DCMB0-BK0A1) |
| Capacidade | 10 xícaras / 1.5 litros |
| Dimensões do produto | 12.36"P x 8.38"L x 16.93"A |
| Peso do item | 9.92 libras |
| Volumetage | 120 Volts |
| Características especiais | Auto Shut-Off, Integrated Coffee Grinder, Keep Warm, Permanent Filter, Programmable |
| Acabamento Exterior | Aço inoxidável |
Garantia e Suporte
Gevi products are manufactured to the highest quality standards. For warranty information or technical support, please refer to the warranty card included with your purchase or visit the official Gevi website. Please have your model number (DCMB0-BK0A1) and purchase date available when contacting support.
Para obter mais assistência, você também pode entrar em contato diretamente com o vendedor por meio da plataforma onde realizou a compra.
Vídeos de produtos
Vídeo: Acimaview of the Gevi 10-Cup Drip Coffee Maker's features and operation. (Duration: 1:34)
Video: Demonstration of the Gevi coffee maker's functionality. (Duration: 1:29)
Video: Detailed guide on using the Gevi coffee maker. (Duration: 3:21)
Video: Quick demonstration of the Gevi coffee maker. (Duration: 1:03)
Video: User guide for the Gevi coffee maker. (Duration: 1:25)
Video: Short clip demonstrating a feature of the Gevi coffee maker. (Duration: 0:49)
Video: Comprehensive demonstration of the Gevi coffee maker's functions. (Duration: 1:51)


